ABS Acetone Vapor Smoothing: Chamber Configuration & Exposure Time Analysis
A structured experiment testing four acetone vapor chamber configurations and five exposure durations on ABS Benchy — finding the setup that actually works and the duration sweet spot before things go wrong.
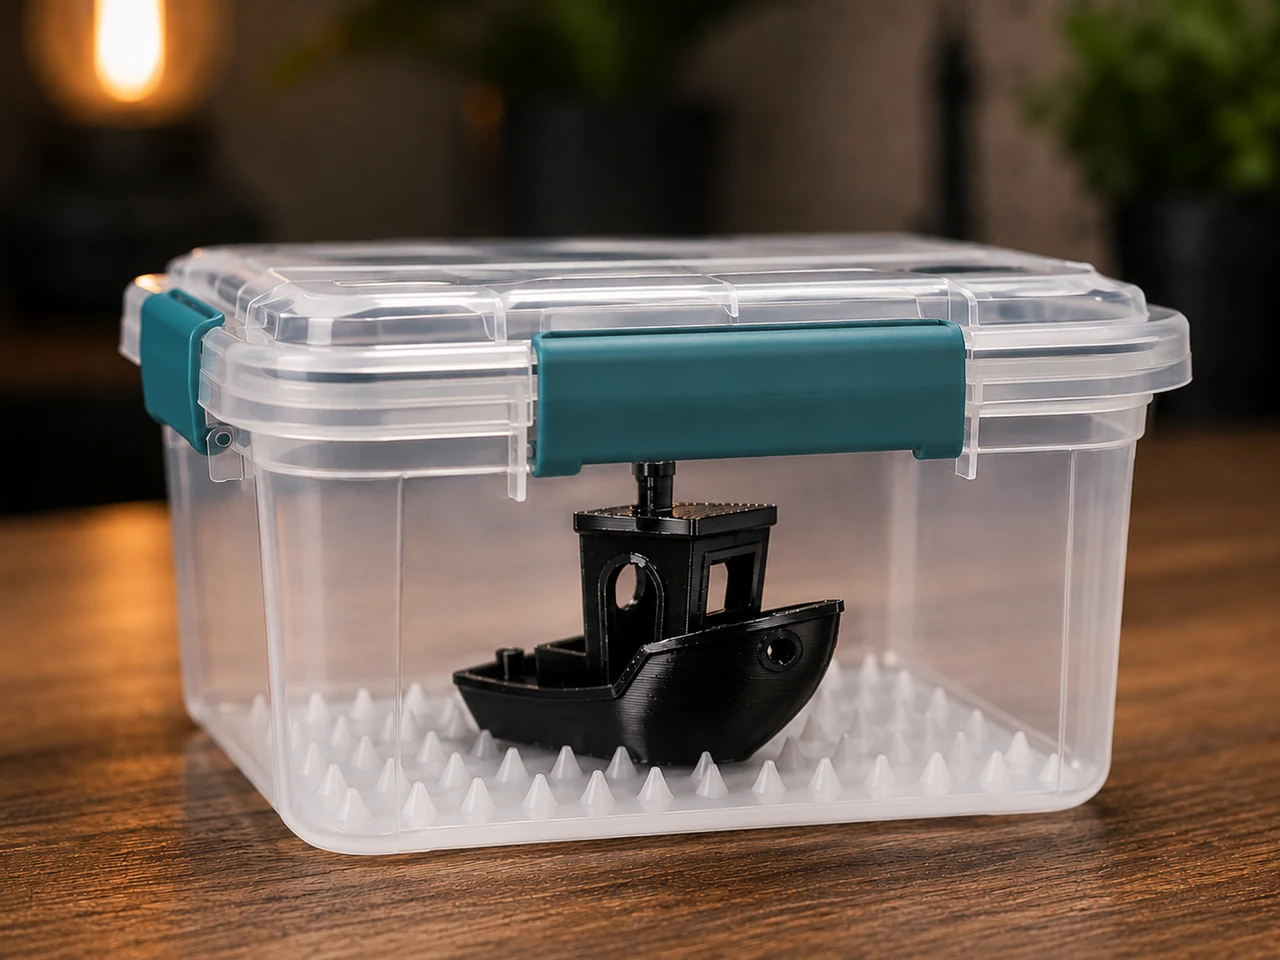
Every post about acetone vapor smoothing says the same thing: pour some acetone in a container, wait a bit, done. But how — with what setup, how much acetone, for how long? Nobody gives actual numbers. So I tested a lot of Benchys to find out.
1. Why Needed a Proper Test
Acetone vapor smoothing works by letting acetone vapour slowly dissolve the surface of an ABS print — just enough to flow together and eliminate layer lines. Done right, you get a glossy, near-injection-moulded finish. Done wrong, the surface bulges, softens, loses detail, or collapses entirely.
Two variables determine the outcome: how you set up the chamber and how long you run it. Every tutorial I found glossed over both. Layer height adds another wrinkle — thinner layers respond faster, which makes timing more critical. Too short and the surface stays matte. Go even slightly too long and things start to go wrong in ways that aren't recoverable.
This phase answers both questions with a structured test rather than guesswork.
2. Conclusions
TLDR — I put conclusions up front. If you're here for the quick answer, this is it. Full test structure, setup notes, and scored data all follow below.
Recommended setup
Use Wick + Fan: paper towels soaked with ~30 mL of >99% acetone, pinned to both side walls of the chamber, with a small fan circulating air. The fan is the biggest single variable. Without it, the Pool setup barely moves the needle.
Recommended exposure time
| Layer height | Exposure time | Result (Score) |
|---|---|---|
| 0.20 mm | 45 minutes | Bow 3 (mostly smooth) Deck 4 (full gloss) Bridge 3 (mostly smooth) Uniformity 3 (glossy, noticeable difference) |
| 0.12 mm | 30 minutes | Bow 3 (mostly smooth) Deck 4 (full gloss) Bridge 3 (mostly smooth) Uniformity 3 (glossy, noticeable difference) |
Both layer heights reach the same final result profile — 0.12 mm just gets there faster. If you can only remember one setup: Wick + Fan, 30 minutes, 0.12 mm — that's the best overall result across both tests. Mostly smooth, full gloss on the Deck, details intact, with well-distributed uniformity and no structural damage.
What to avoid
- Pool (no fan) — almost completely ineffective at 30 minutes.
- Anything beyond 30 min for 0.12 mm, or beyond 60 min for 0.20 mm — over-smoothing risk rises sharply on hull curves. T45-12 shows early bow denting; T60-12 has a clearly visible dent. T90-20 also shows fairly visible dents on the bow.
- Reusing acetone-soaked towels from a prior session — acetone evaporates quickly and the concentration drop is significant.
What doesn't smooth regardless
Don't worry, ABS smoothing can still produce uniform results. A Benchy isn't simple geometry, so some areas are just harder to reach.
- The chimney — Grade 1 (no change) in every single run. Too narrow and elevated for vapour to pool.
- The bridge roof — consistently Grade 2 (partial), partially shielded by the overhanging structure above it.
No fan? Wick-only still works
Setting up a fan inside the chamber takes a bench power supply, wiring, and some effort — not always practical. The good news: wick-only (no fan) isn't far off from the full setup — it just produces slightly uneven results across the model. Two adjustments help close the gap:
- Use a smaller container sized to fit your model rather than a large universal chamber. Less dead air volume means the wick saturates the space more efficiently.
- Add ~15 minutes to the recommended exposure time as a starting point, then tune in 15-minute increments from there.
In practice, wick-only at 60 minutes still gets the Deck to mostly smooth or full gloss and gives partial improvement on the Bridge. The Bow is the weak point — expect visible layer lines to remain without a fan. For a large universal chamber, wick-only is most effective on surfaces that face upward; don't expect the same uniformity on compound curves or recessed geometry.
3. Test Structure
The experiment is split into two parts:
Batch 1 — Chamber config test. Compare four chamber setups at a fixed 30-minute exposure, across two layer heights (0.20 mm and 0.12 mm). Goal: find which setup actually saturates the air enough to smooth the whole print, and which ones are a waste of time.
Batch 2 — Duration sweep. Take the winning config from Batch 1 and sweep exposure time across five durations (15, 30, 45, 60, 90 min). Goal: find the sweet spot — long enough for a proper finish, short enough to avoid over-smoothing.
The four chamber configurations tested:
| Setup | Description |
|---|---|
| Pool | 30 mL acetone poured directly into the container base |
| Wick | Acetone soaked into paper towels pinned to both side walls |
| Pool + Fan | Pool method with a small fan circulating air inside |
| Wick + Fan | Wick method with fan added |
4. Gear & Chamber Setup
Everything you need for the wick + fan method (the winner — more on that below): Most components and acetone are available at your local hardware store, Bunnings, for example, if you're in Australia.
Materials:
- 12 L storage box — smoothing chamber. ~288 × 382 × 153 mm. Check that the lid has a decently deep groove where it meets the rim; shallow-fitting lids let vapour escape fast. I use this IP67 Waterproof Storage Box from Bunnings (or your local hardware store). Remember to check material should be PP (Polypropylene)
- Acetone >99% pure — available at most hardware stores. Check the datasheet. Diluted acetone won't give the same results. My Acetone also from Bunnings.
- Measuring cup and funnel — keeps sessions consistent. You'll be surprised how little acetone you actually need; measuring prevents overdoing it.
- Kitchen paper towels × 2 — for the wick-based setups.
- 8 magnets — to hold the towels against the container walls from the outside. One magnet inside, one outside, sandwiching the towel through the container wall. Four magnets per towel, two towels (one on each side wall). I use Neodymium disc magnets (N35, high-strength), they're good to use and easy to find from Amazon / AliExpress
- Printed pin supports — minimise contact area between the support and your print, giving vapour more access to the base. Print in PETG — it holds up against acetone. You can use the customisable PEG Pin Board on Makerworld — treat it as a consumable. It takes only a few grams of PETG to print, the pins are low-profile (less penetration into the model), and PETG handles acetone vapour well.
- Small fan + bench power supply with alligator clips — for air circulation. Variable voltage is useful to avoid running full speed.
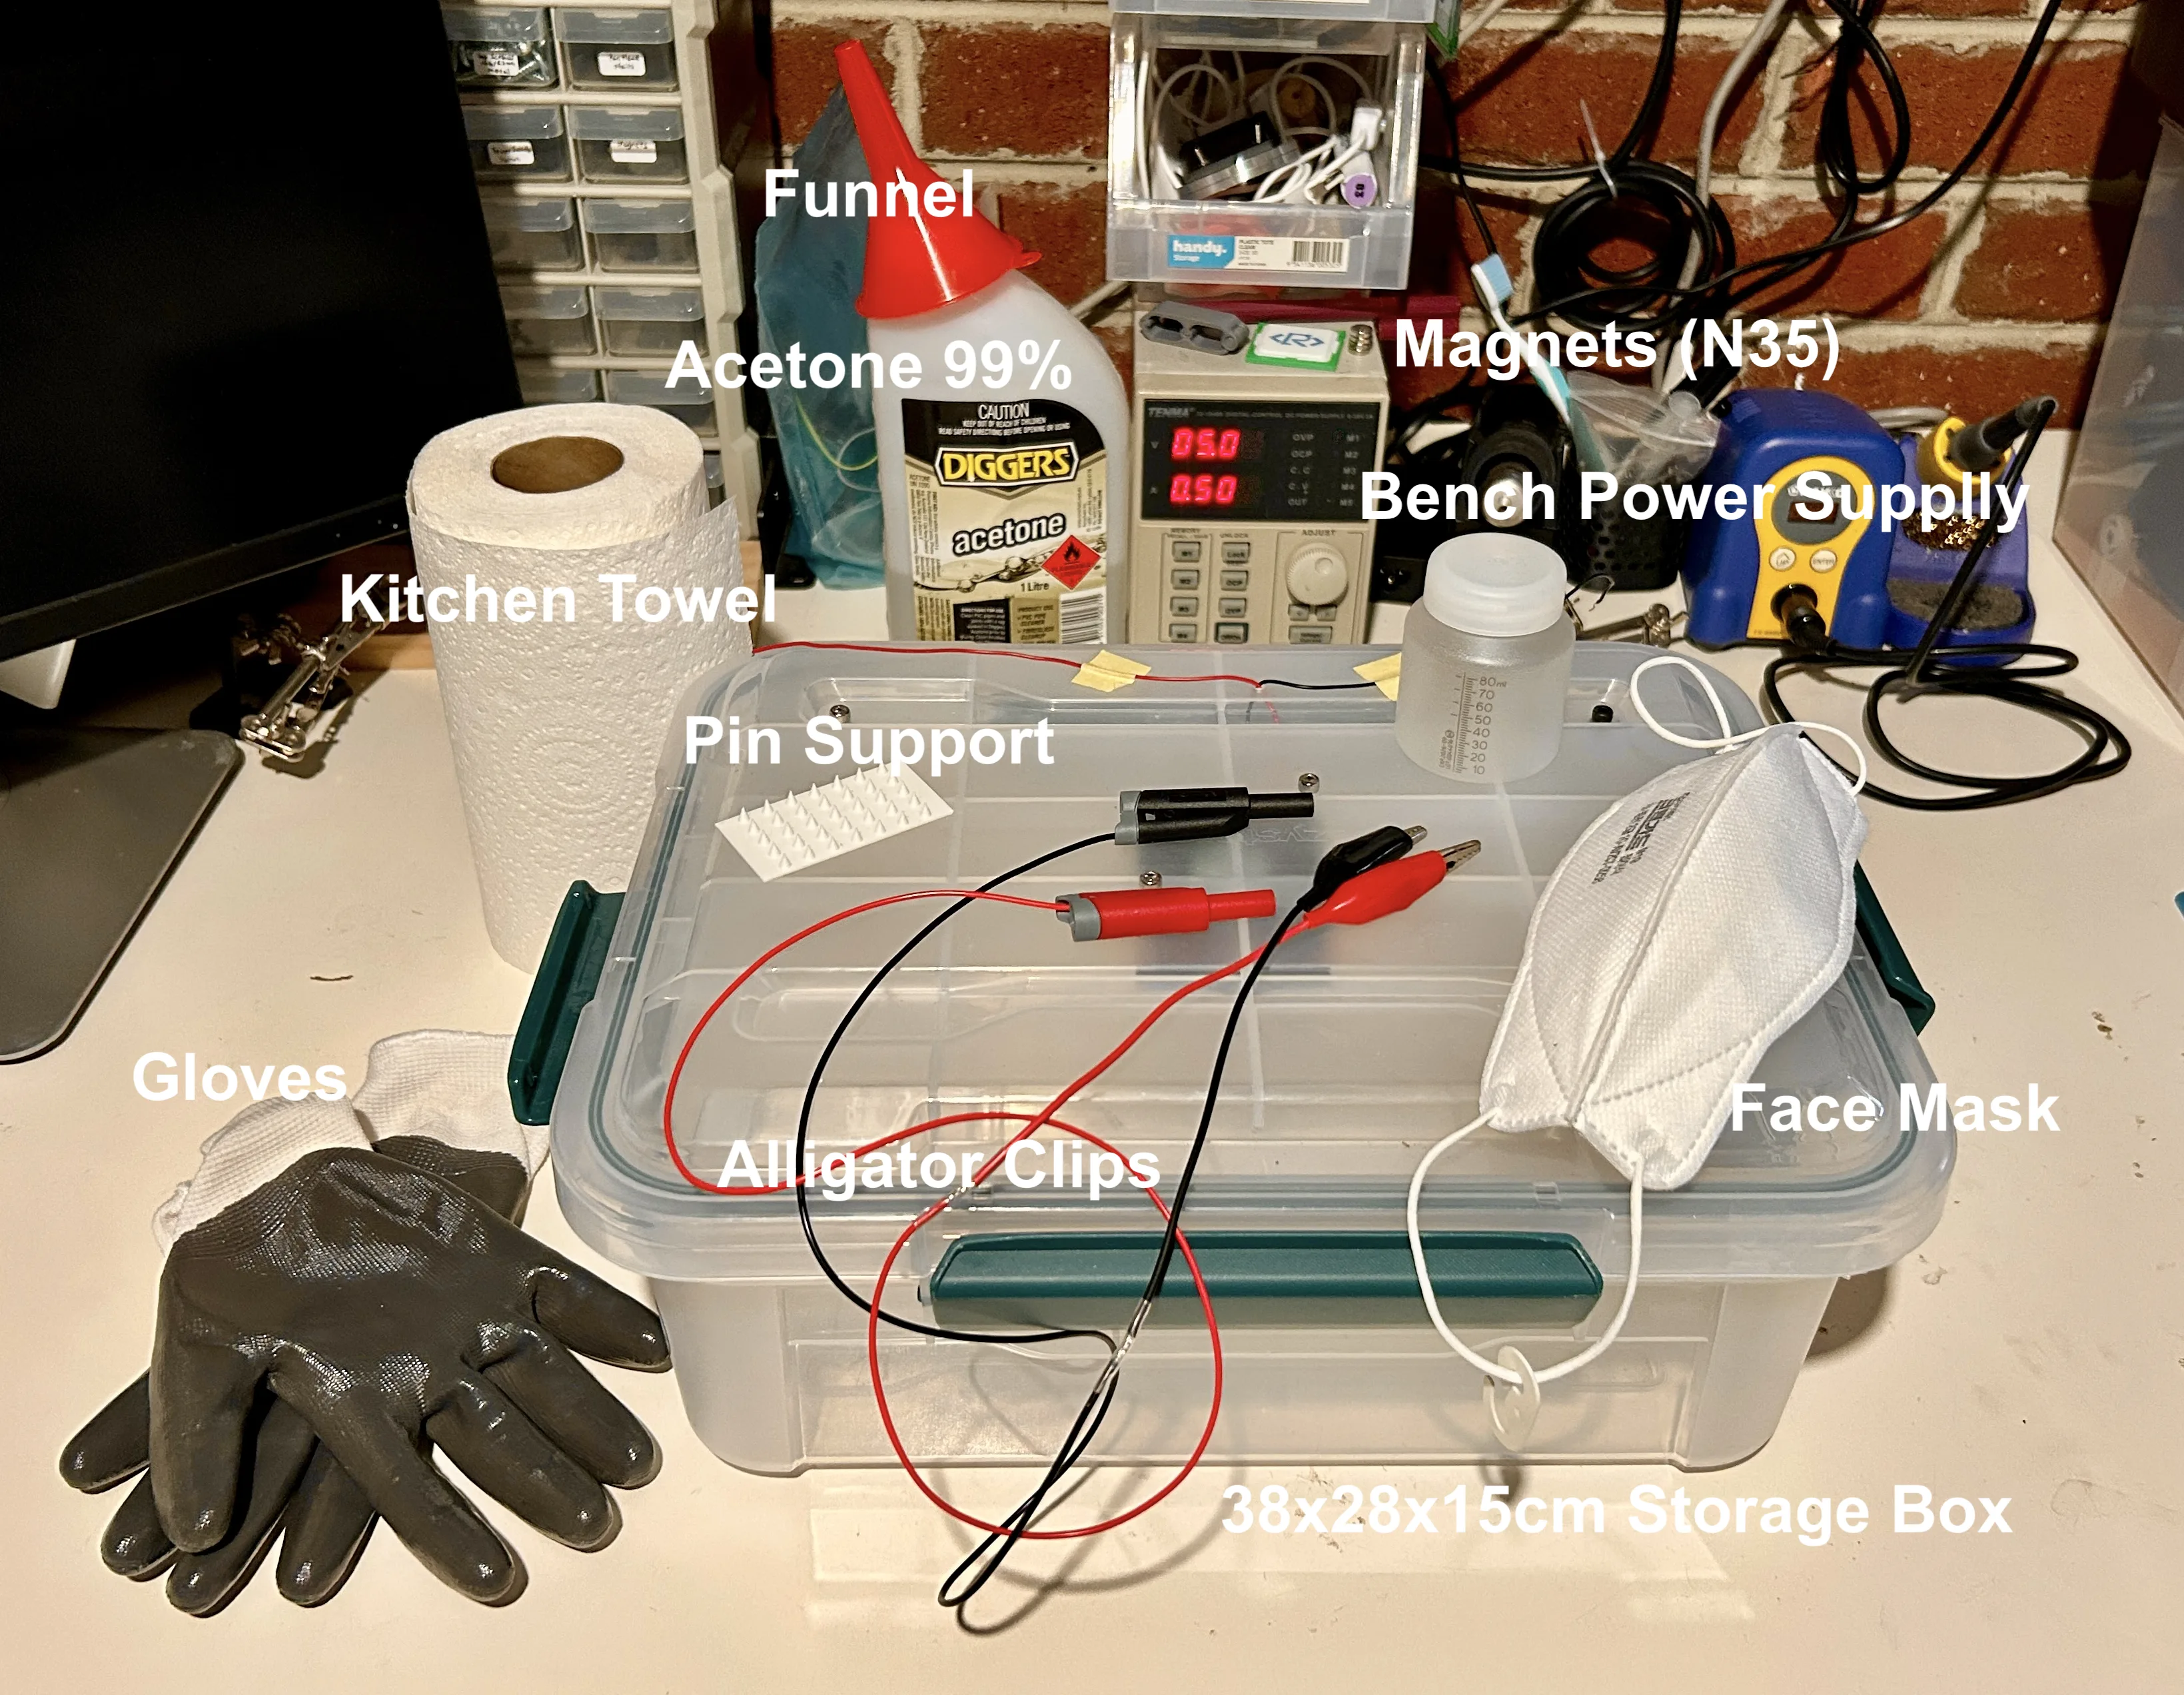
All materials: storage box, acetone, kitchen towel, pin supports, magnets, bench power supply with alligator clips, measuring cup, gloves, and respirator.
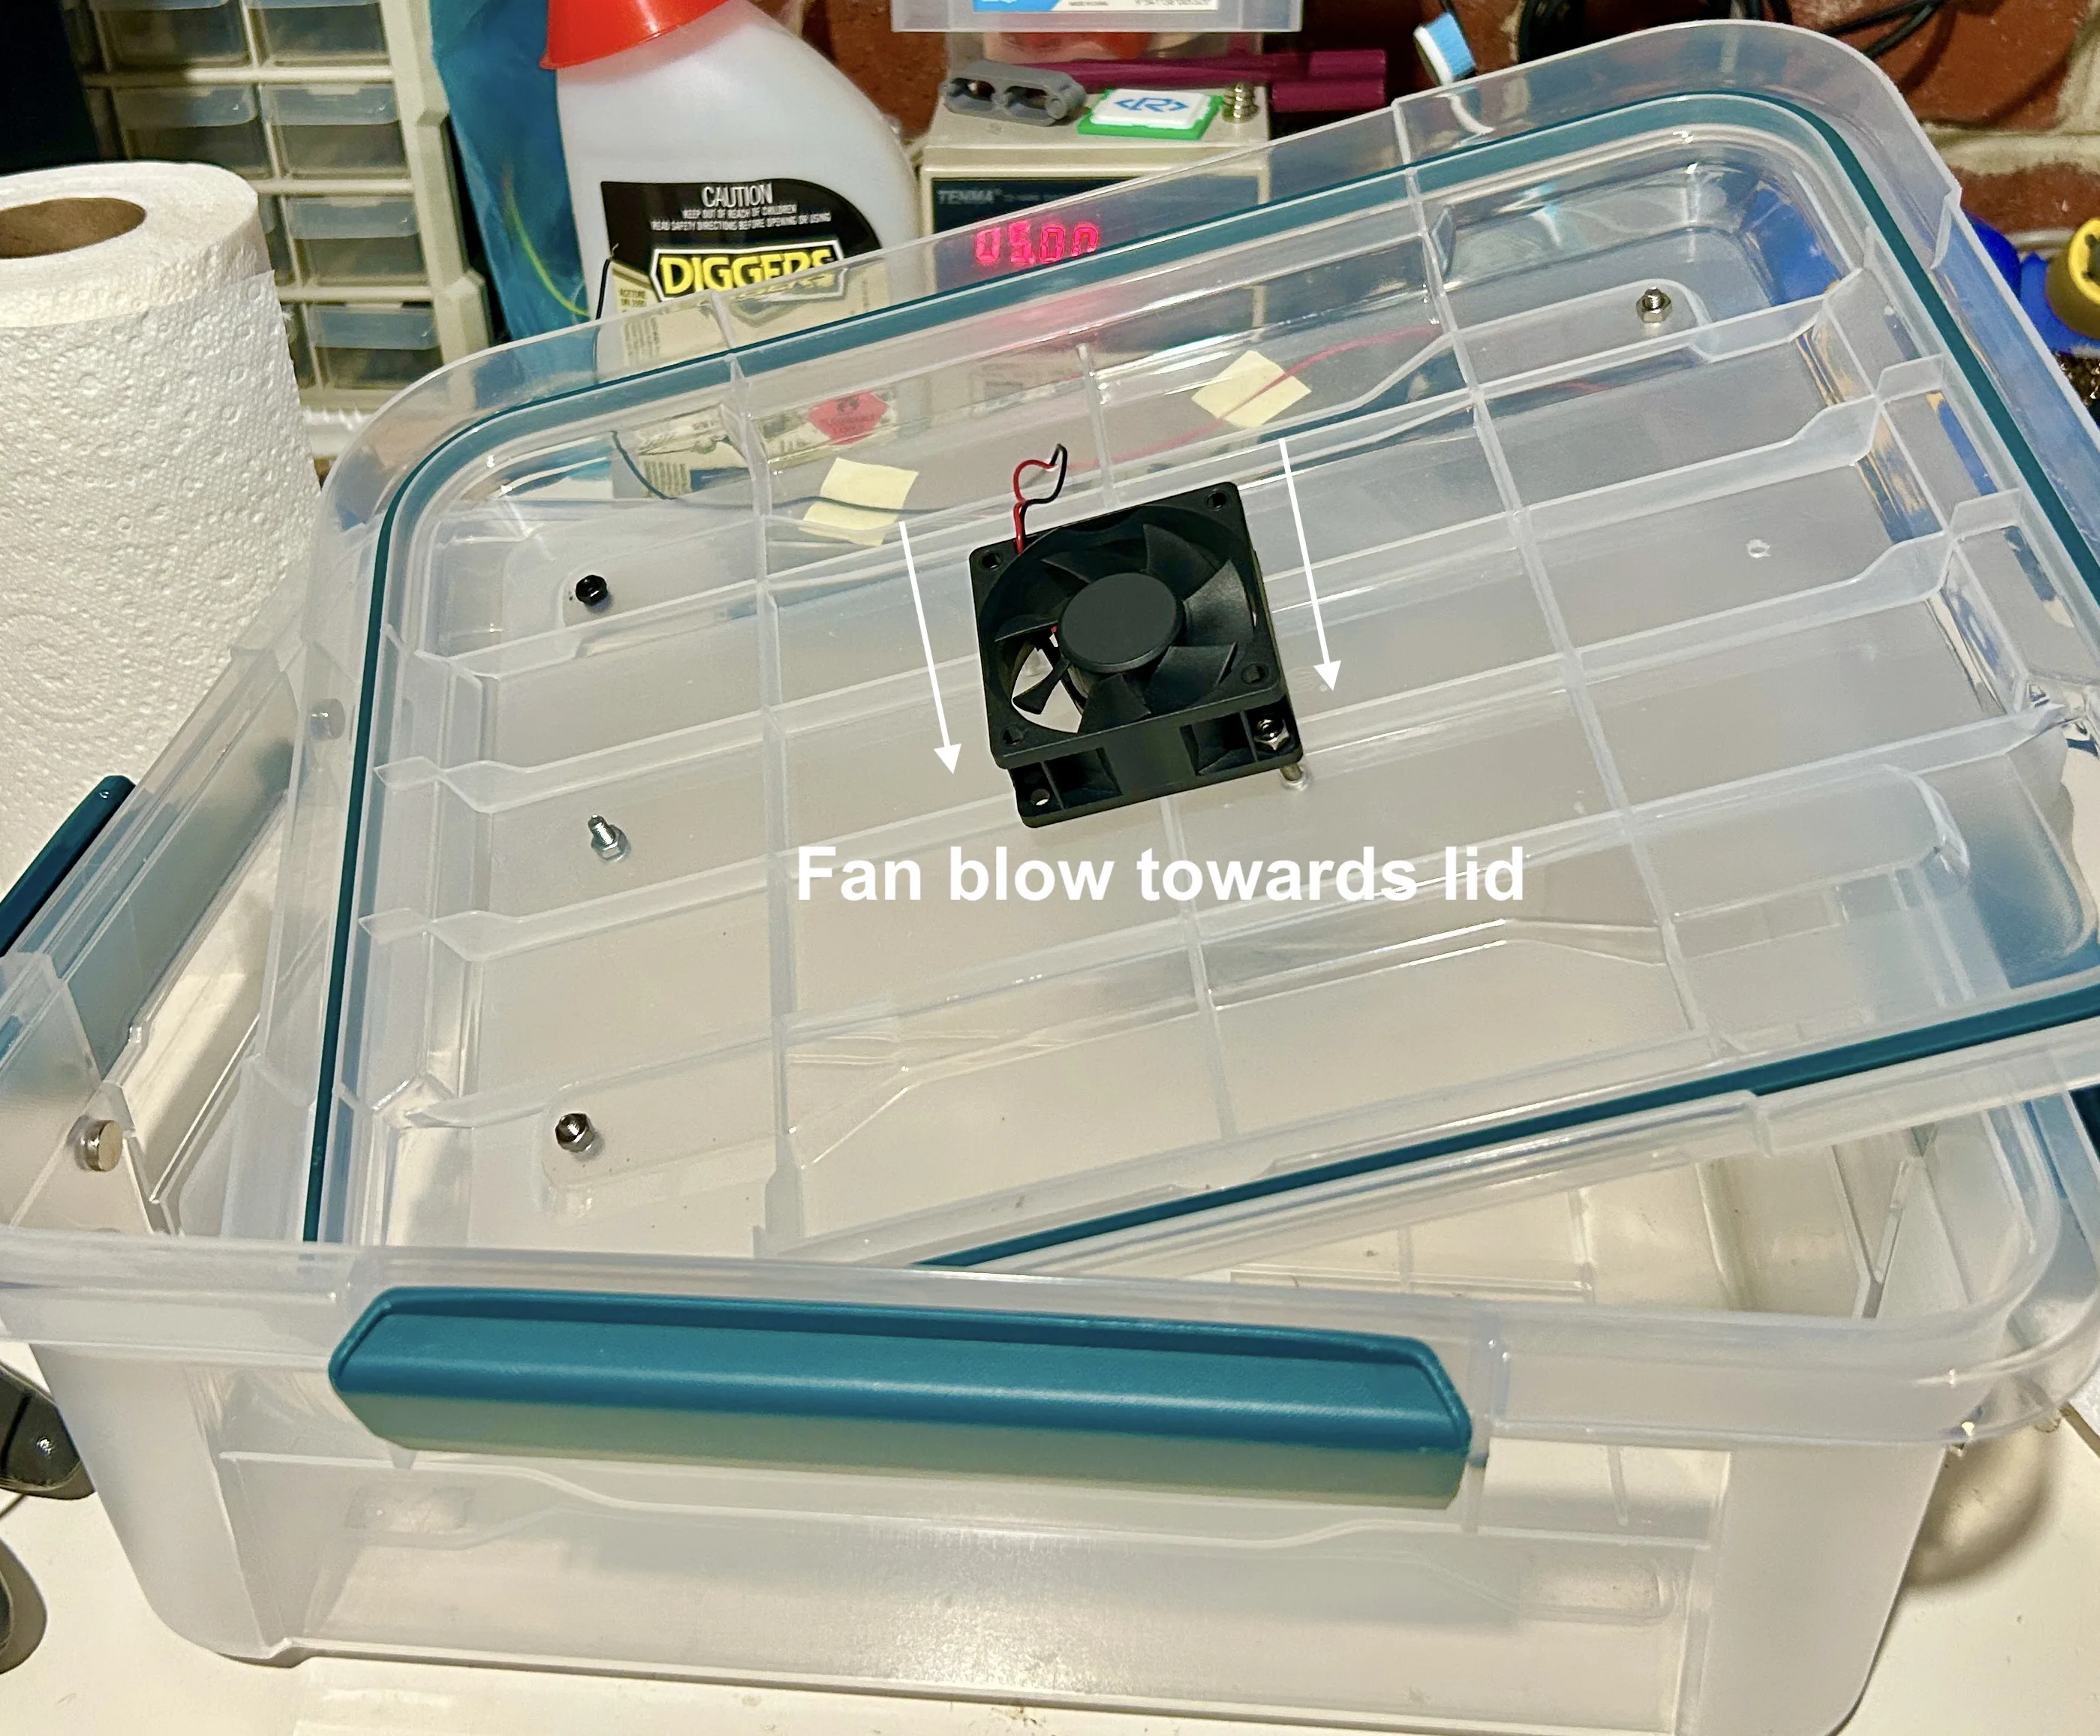
Fan positioned on the inside of the lid, blowing downward — pushes vapour around the chamber and prevents it from stratifying near the base.
Safety
Acetone fumes build up fast in an enclosed space and are flammable. Gloves and a respirator are non-negotiable. Work in a ventilated area, keep ignition sources away, and have a fire extinguisher nearby.
Setup procedure:
- Soak both paper towels with acetone and pin them to the inside side walls using magnets (one inside, one outside per point — 4 per towel).
- Place the Benchy on pin supports in the centre of the container.
- Set the fan inside the chamber, connected to the bench supply via alligator clips.
- Seal the lid and start the timer.
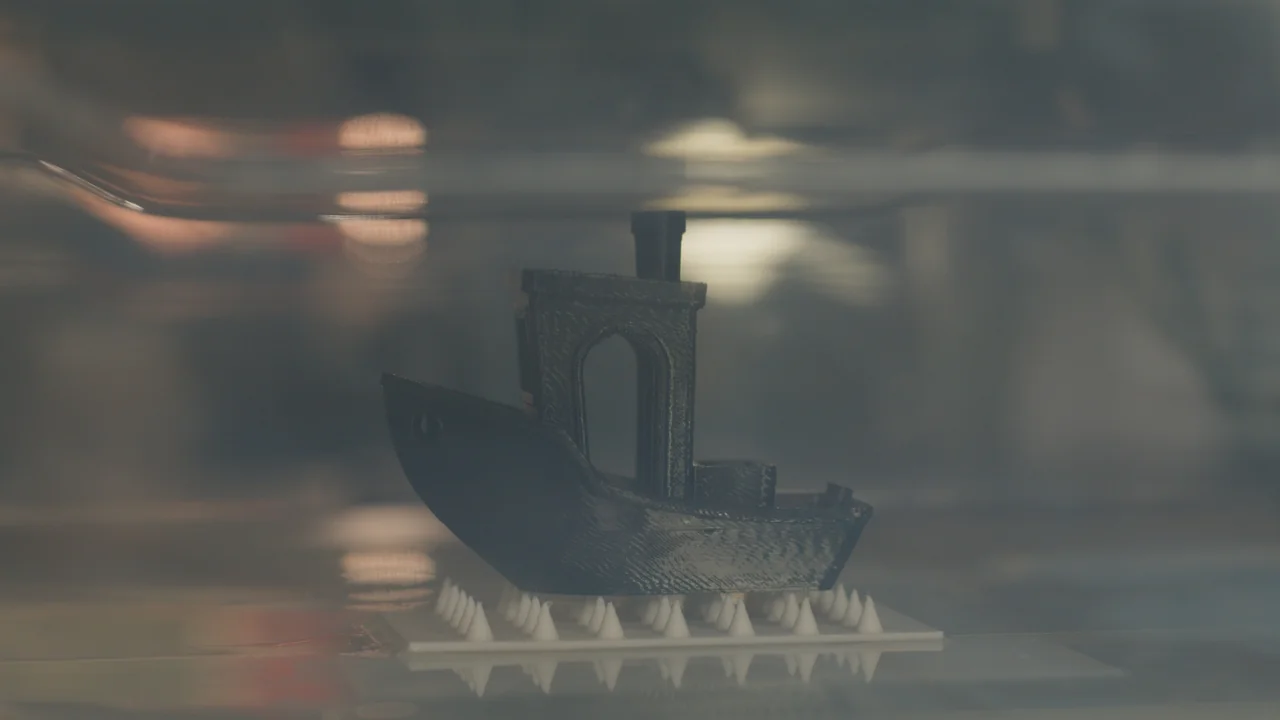
Chamber sealed and running — acetone vapour builds up inside, softening the surface layer
Between sessions: air out the container for 5–10 minutes, wipe dry, and use fresh acetone and fresh towels each time.
Test conditions for this batch: ~23 °C ambient, ~30% humidity, 30 mL acetone per session.
5. Scoring Method
All Benchies were assessed 24 hours after smoothing, across five surface zones: Bow, Deck, Bridge, Bridge Roof, and Chimney. Each zone is graded 1–5:
| Grade | Smoothness |
|---|---|
| 1 | No visible change from baseline |
| 2 | Partial — matte, layer lines still visible |
| 3 | Mostly smooth, semi-gloss, details intact |
| 4 | Full gloss, minor detail loss |
| 5 | Over-smoothed — sagging, dents, or collapse |
Uniformity is scored separately:
| Grade | Uniformity |
|---|---|
| 1 | No change |
| 2 | Mostly uneven |
| 3 | Glossy but still noticeable difference |
| 4 | Even all surfaces |
| 5 | Over-smoothed and budge appears |
Scores immediately after removal would read falsely high — ABS stays soft for several hours while residual acetone off-gasses. 24 hours gives a stable, representative result.
6. Evaluation Model — Why Benchy, Why These Zones
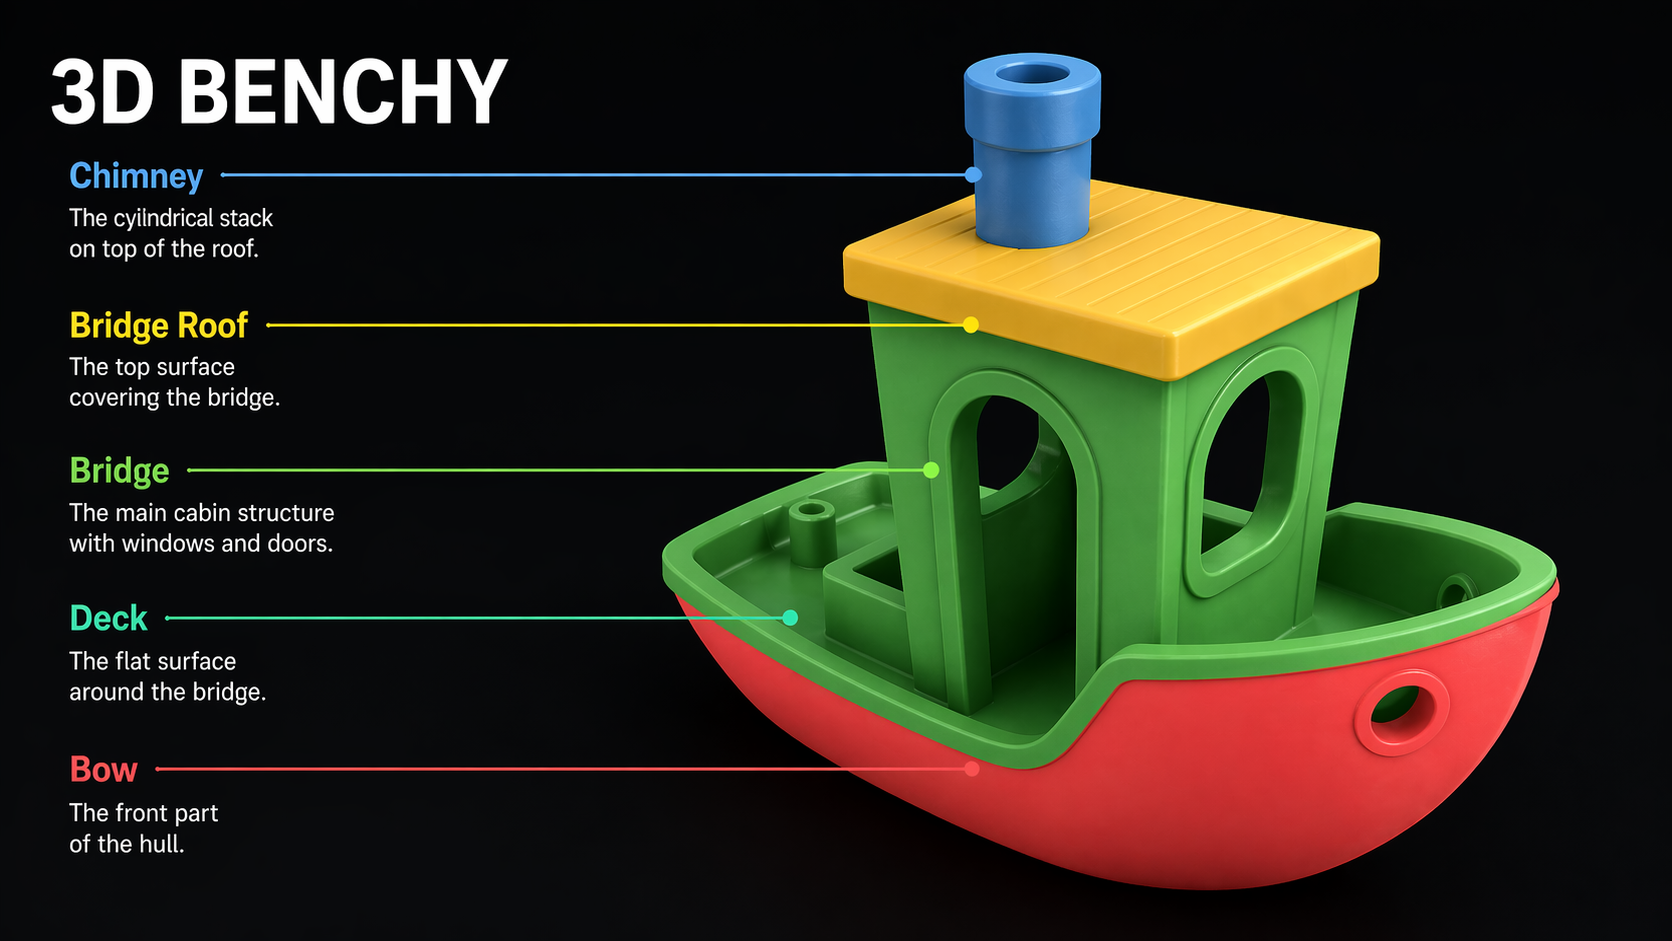
Benchy was chosen because its geometry packs a wide variety of surface types into a small, consistent print. Each of the five scored zones presents a different exposure challenge:
| Zone | Why it matters |
|---|---|
| Bow | Exposed curved hull — tests broad surface smoothing across compound curves |
| Deck | Flat open top — the easiest surface; a baseline for whether the chamber works at all |
| Bridge | Complex overhanging structure — tests whether vapour penetrates recessed geometry |
| Bridge Roof | Shielded underside — partially blocked by the overhang above it |
| Chimney | Narrow, elevated protrusion — tests whether vapour reaches the highest point |
Scoring all five on the same print shows how evenly each setup saturates the chamber — not just whether flat surfaces smooth.
7. Batch 1 — Chamber Configuration Test
Each of the four setups was run at a fixed 30-minute exposure, on both 0.20 mm and 0.12 mm Benchies (8 prints total).
Results — Batch 1
Key observations from Batch 1:
- Pool (no fan) was dead last — almost no smoothing at 30 minutes regardless of layer height. The acetone sitting at the base never saturated the air enough.
- Wick (no fan) gave partial results on exposed flat surfaces (Deck reached Grade 3 — mostly smooth, semi-gloss) but complex geometry like the Bridge and Bow barely moved.
- Pool + Fan pushed the Deck to Grade 4 (full gloss) on both layer heights, and the fan circulation boosted the Bow for 0.12 mm prints to Grade 3 (mostly smooth). A clear step up from static setups.
- Wick + Fan was the overall winner. For 0.12 mm prints it reached Grade 3 (mostly smooth) on the Bridge (the most complex surface), Grade 4 (full gloss) Deck, and Uniformity 3 — the only setup to reach even distribution.
- Thinner layers respond better across all methods. 0.12 mm prints consistently scored equal or higher than 0.20 mm prints with the same setup. The reason: thinner layers have less mass per layer to dissolve before the surface smooths, so the same vapour concentration moves them further in the same time.
The fan is non-negotiable. Adding a fan roughly doubles the effective smoothing across most surfaces — without it, acetone vapour stratifies near the base and never reaches upper geometry like the chimney, bridge roof, or bow curves.
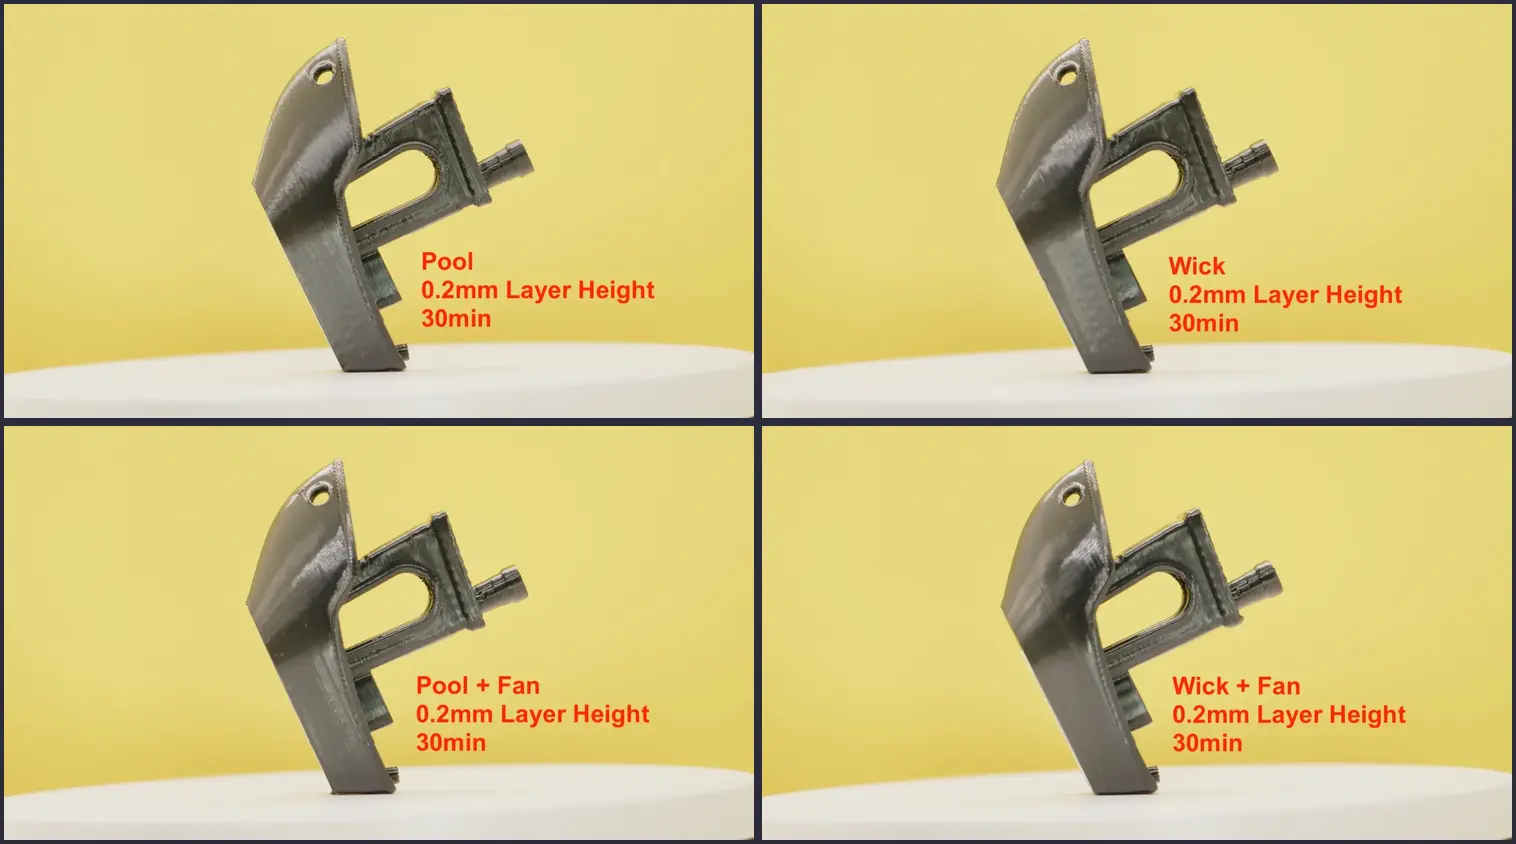
Side — 0.20 mm, 30 min. Pool and Wick barely move the hull; Wick + Fan leads with visible smoothing on the bow curves.
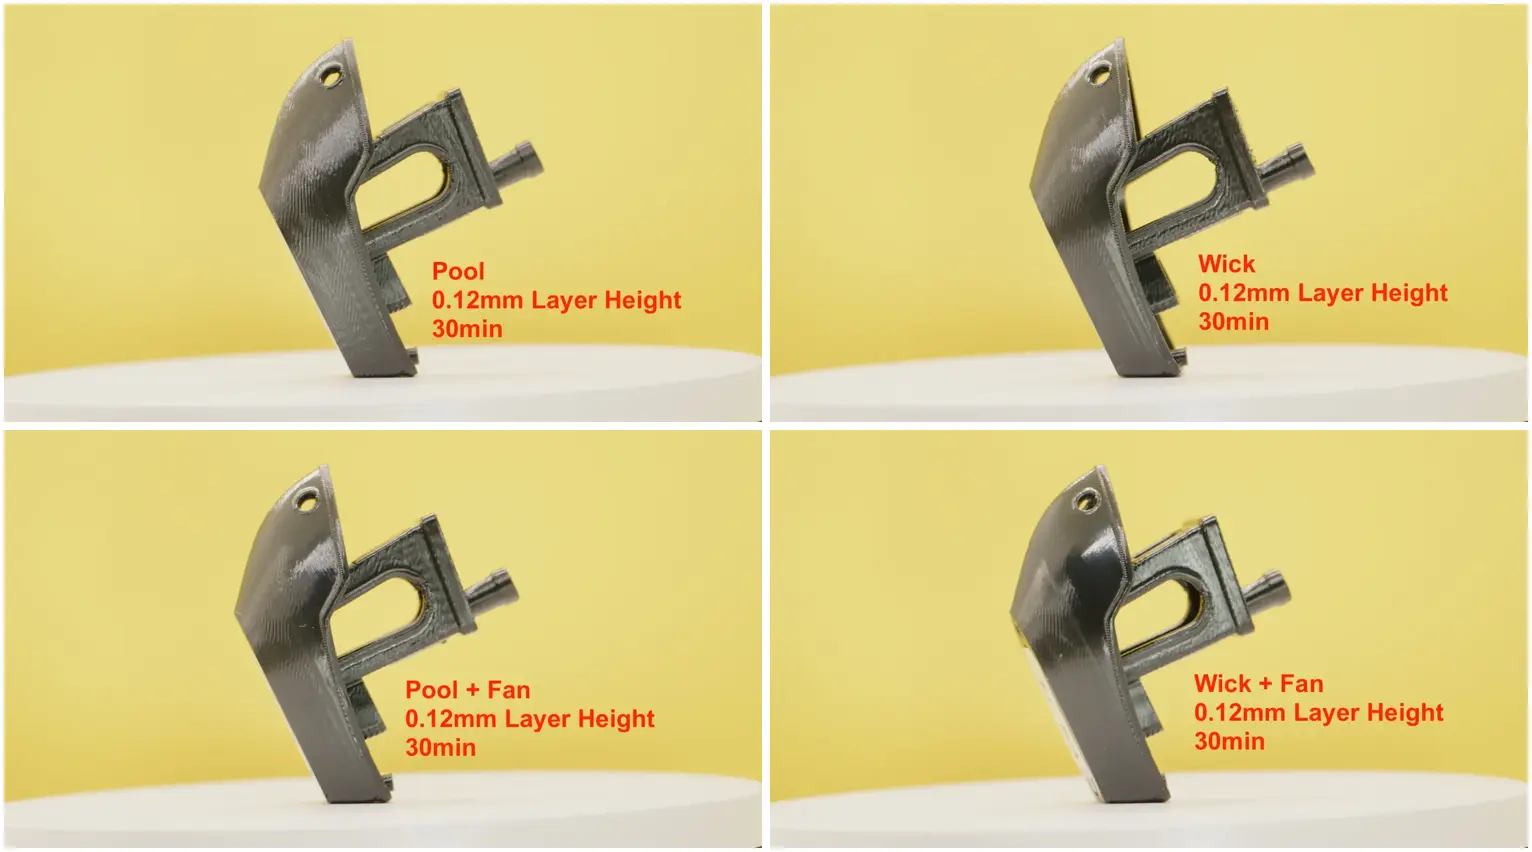
Side — 0.12 mm, 30 min. Thinner layers respond more readily — Pool + Fan now reaches Grade 3 on the bow; Wick + Fan is the clear leader.
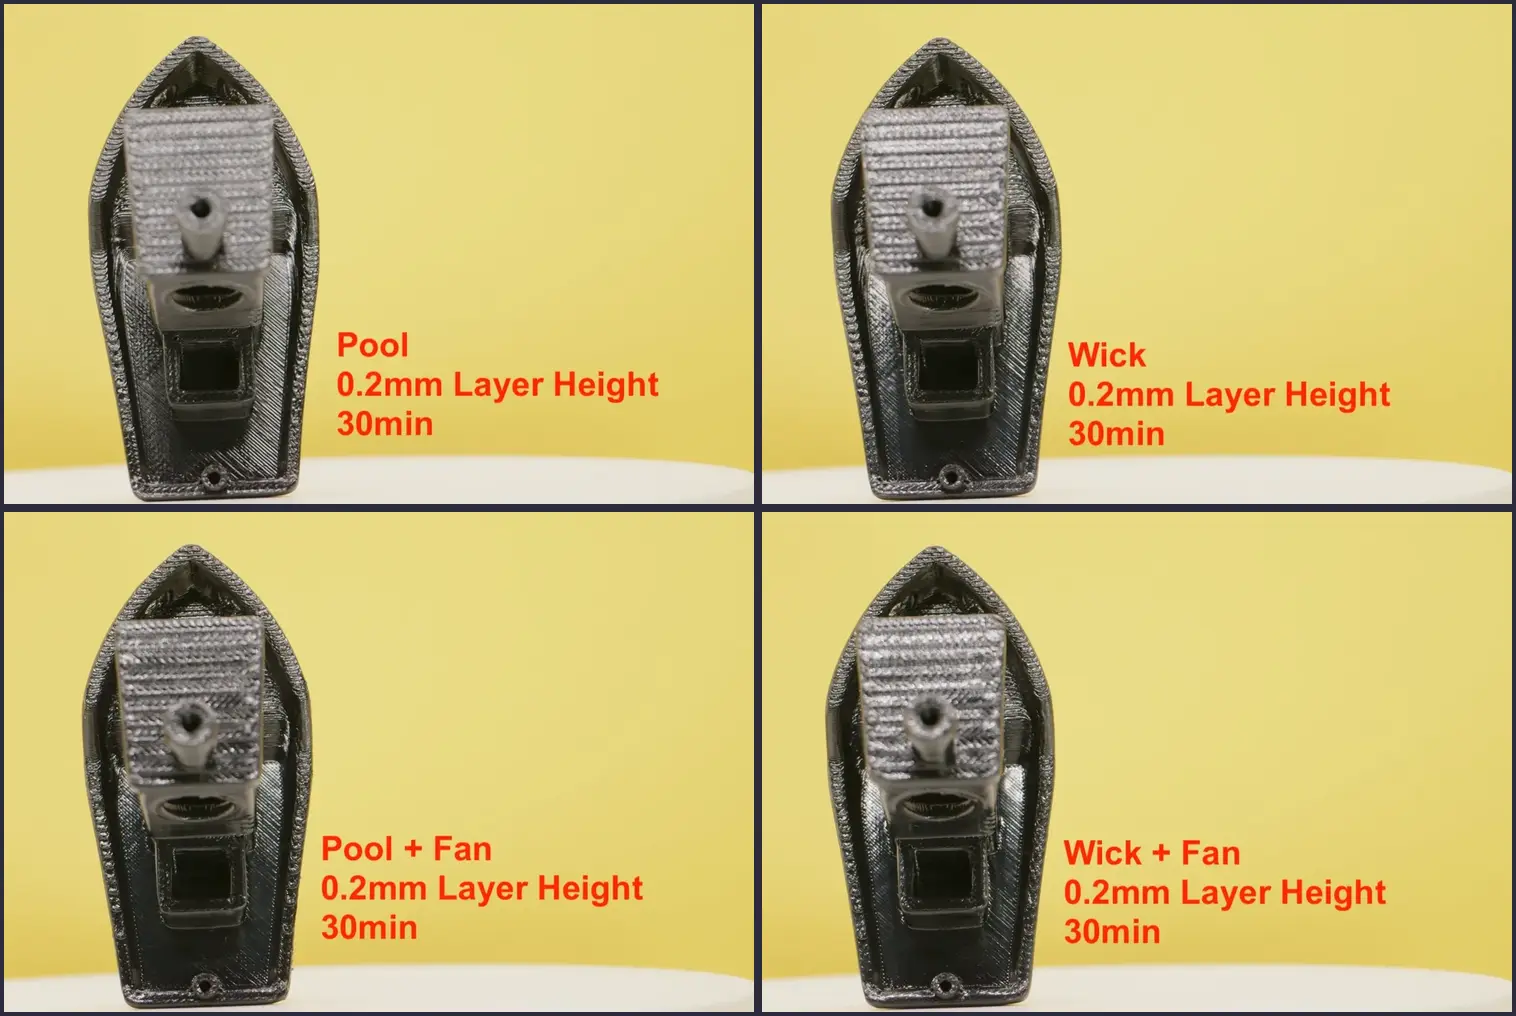
Top — 0.20 mm, 30 min. Deck surface confirms the ranking: Wick + Fan reaches Grade 4; Pool shows almost no change.
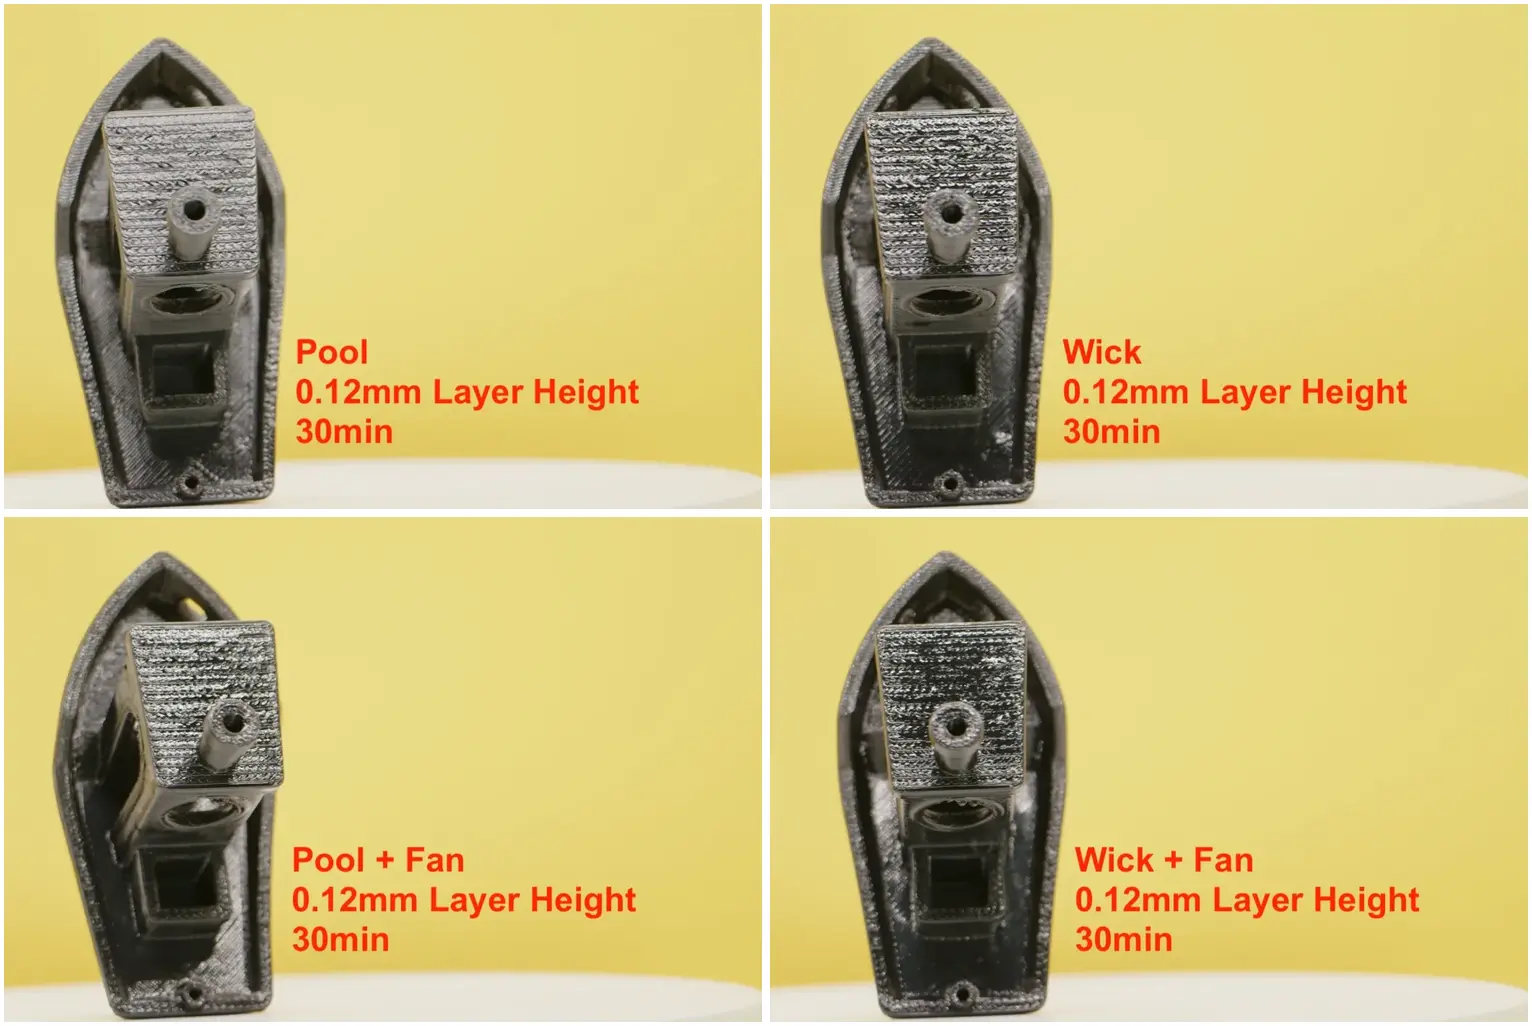
Top — 0.12 mm, 30 min. Fan-assisted configs smooth the Deck noticeably; layer height has minimal effect on this open surface.
8. Batch 2 — Duration Sweep
With Wick + Fan confirmed as the best config, the focus shifted to finding how long to run it. The sweep covered: 15, 30, 45, 60, and 90 minutes, on both 0.20 mm and 0.12 mm Benchies. The 30-minute data point is reused from Batch 1.
Results — Batch 2
Key observations from Batch 2:
- 15 minutes is not enough for either layer height. The 0.20 mm print barely reaches Grade 2 (partial, still matte) on flat surfaces; the 0.12 mm is slightly better on the Deck (Grade 3 — mostly smooth, semi-gloss) but the Bow and Bridge remain unchanged.
- 30 minutes is the turning point for 0.12 mm prints. Bow reaches Grade 3 (mostly smooth), Deck Grade 4 (full gloss), Bridge Grade 3, Uniformity Grade 3 — the best balanced result for this layer height.
- 45–60 minutes is the sweet spot for 0.20 mm. Grades plateau here: Bow 3 (mostly smooth), Deck 4 (full gloss), Bridge 3, Uniformity 3. There's no improvement beyond 45 minutes, but the results hold stable.
- 90 minutes on 0.20 mm triggers over-smoothing. Bow jumps to Grade 5 (over-smoothed — denting visible) on the hull curves. Stop before this.
- 0.12 mm over-smooths earlier than 0.20 mm. T45-12 shows the first bow dent (Grade 5 — subtle but present). T60-12 has a clearly visible dent on the bow hull. Stop at 30 minutes for 0.12 mm; the window between good result and damage is narrow.
- Chimney consistently scores Grade 1 (no change) across every test. It's too elevated and narrow for acetone vapour to reach effectively, even with a fan. This won't smooth regardless of setup.
- Bridge Roof consistently scores Grade 2 (partial). Partially shielded geometry — some improvement over baseline but always limited.
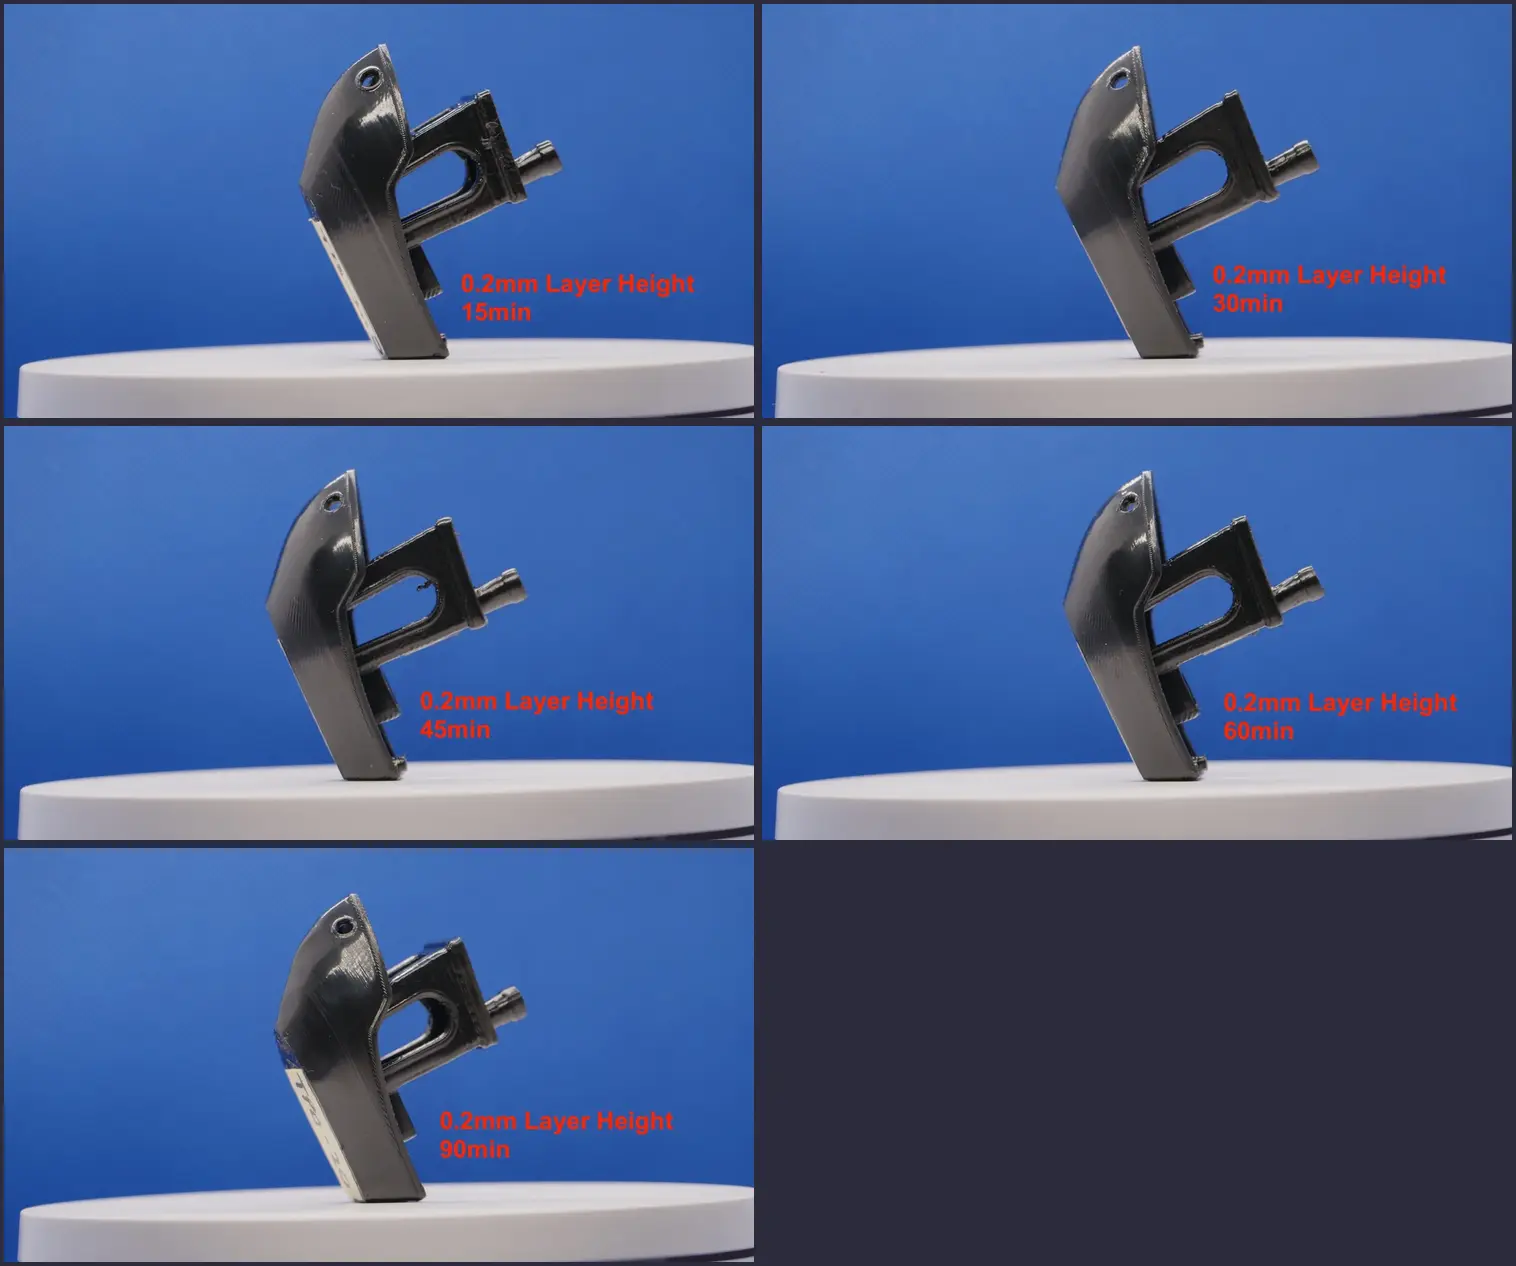
Side — 0.20 mm, Wick + Fan. 15 min barely registers; smoothing builds through 30–45 min; 90 min introduces visible denting on the bow hull.
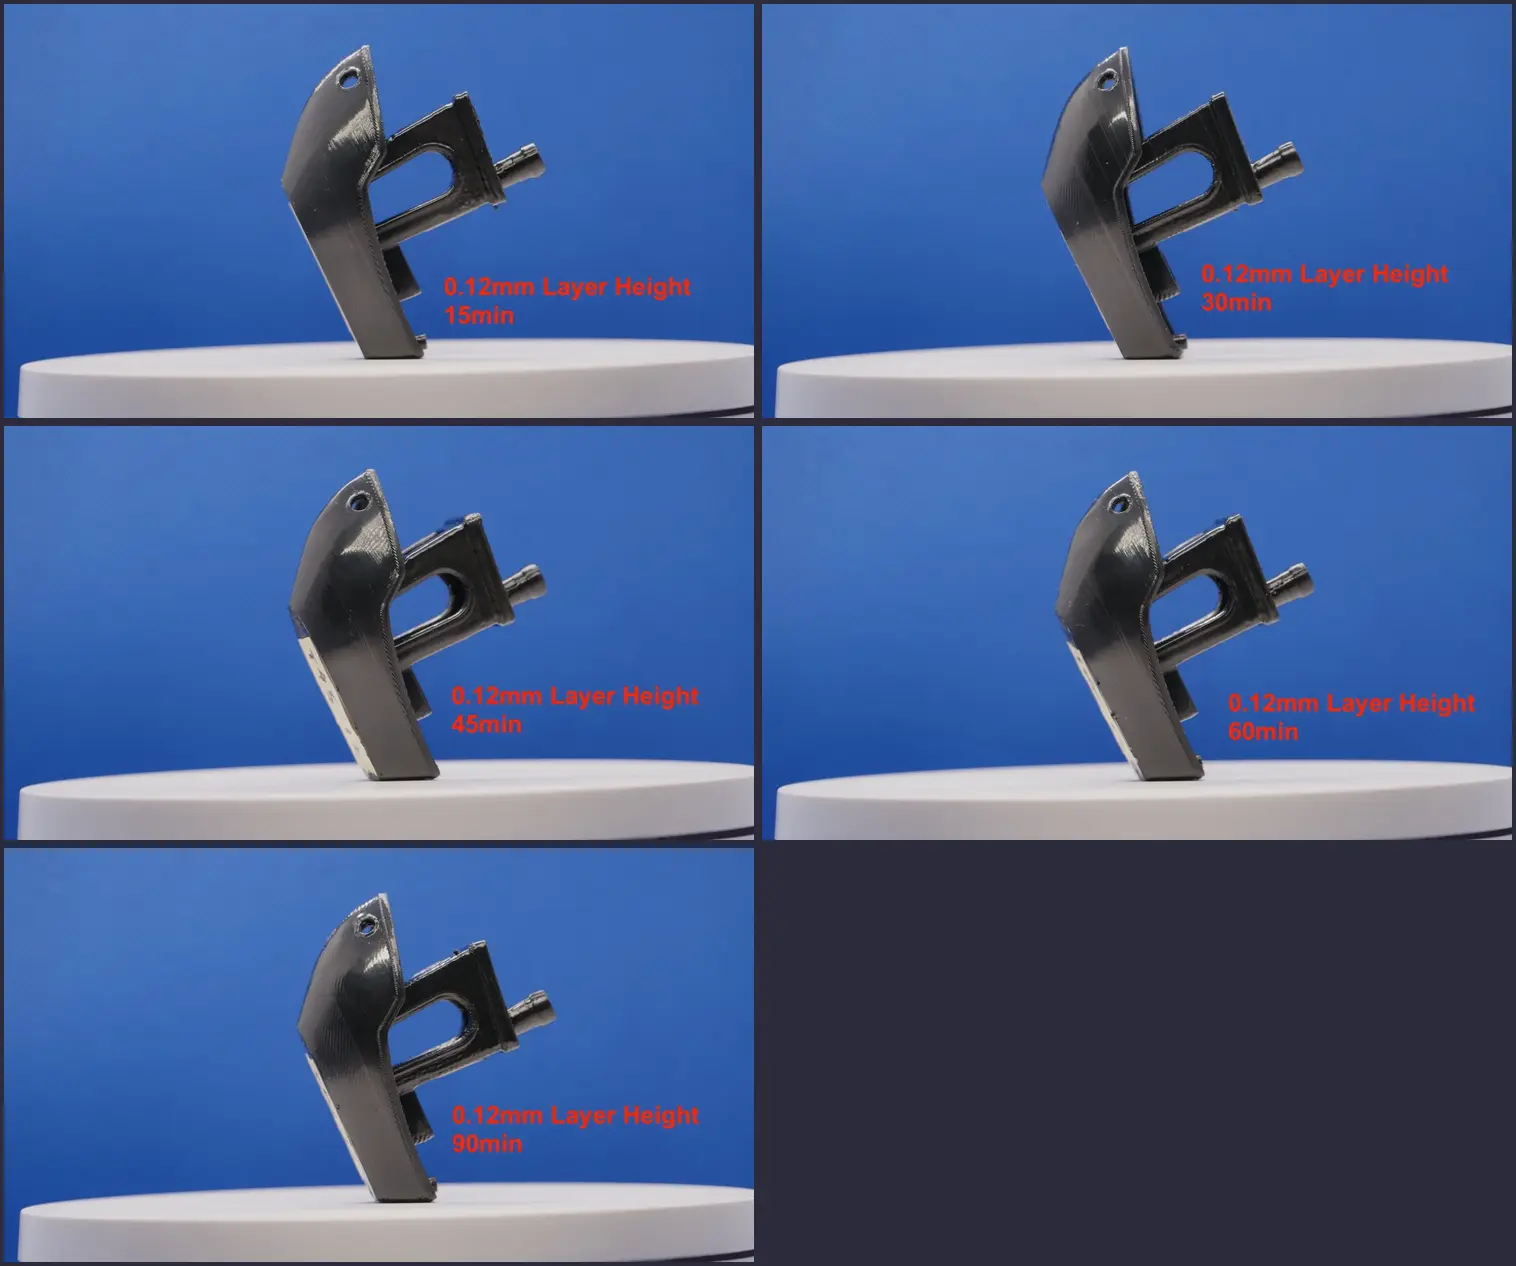
Side — 0.12 mm, Wick + Fan. 30 min already delivers a strong result; 90 min shows clear softening and bow deformation.
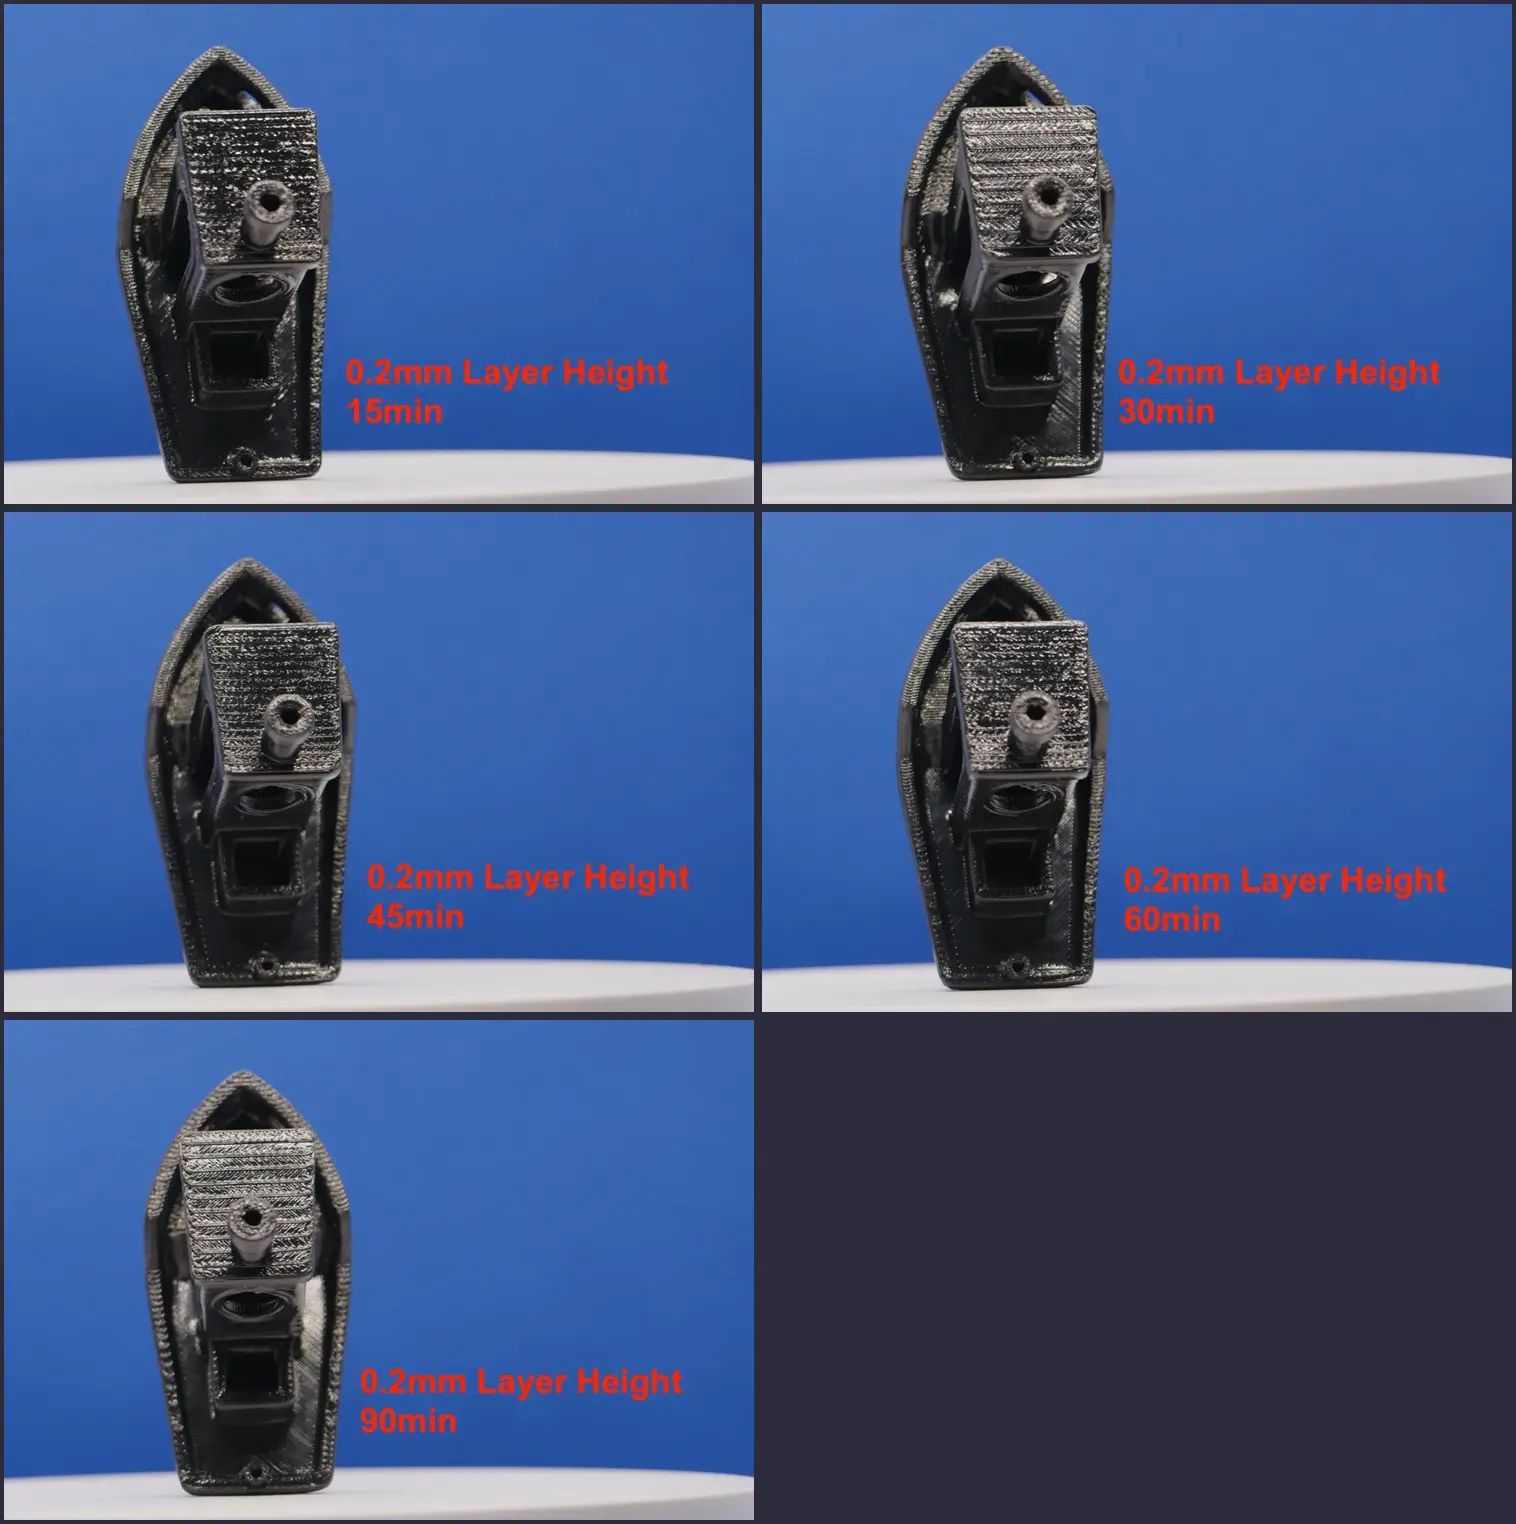
Top — 0.20 mm. Deck flattens from 30 min and plateaus; extra time adds no visible benefit to this open surface.
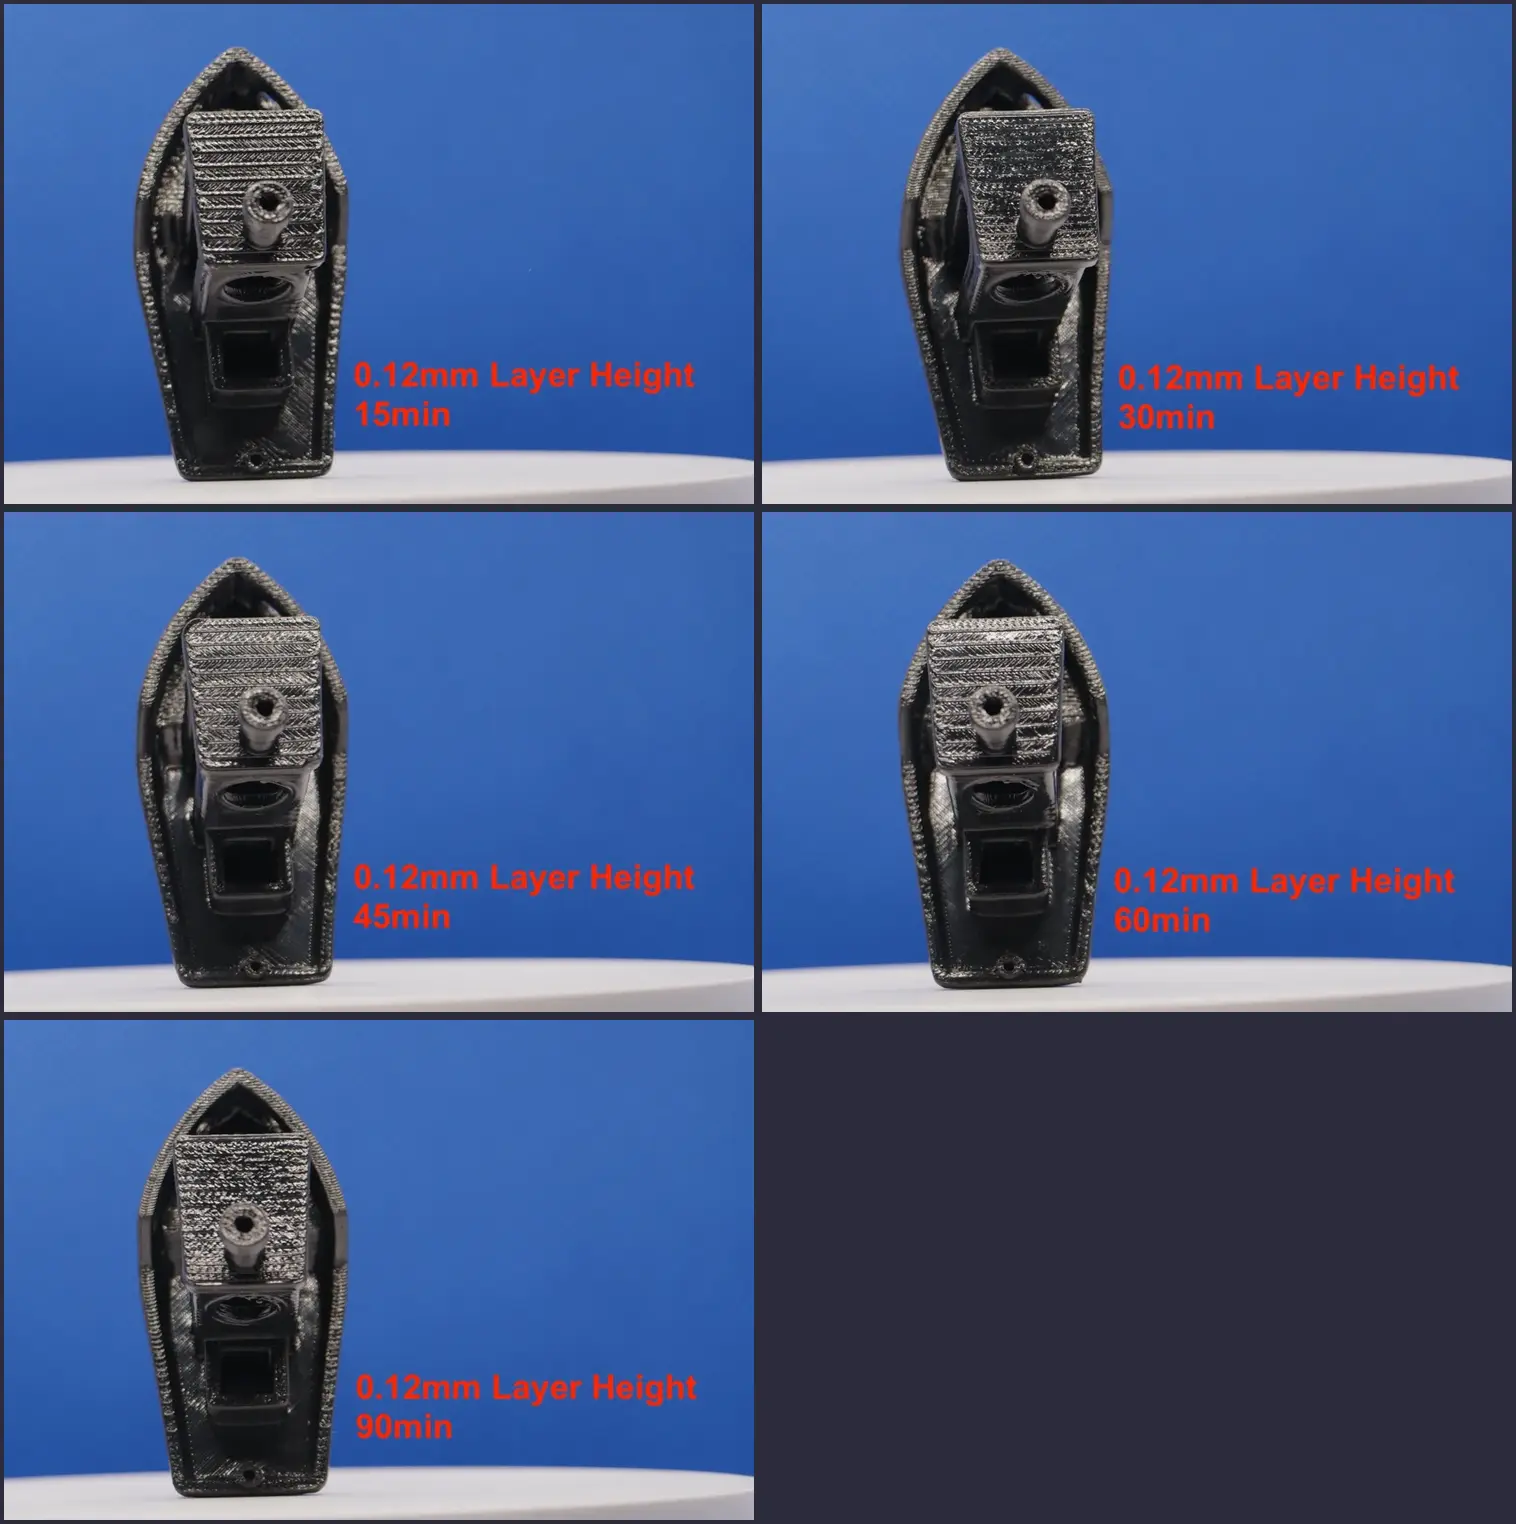
Top — 0.12 mm. Plateau behaviour matches 0.20 mm — the top surface saturates early and holds steady across longer durations.
Where Dents Come From
The bow is the first and most consistently dented area. The progression across three specimens shows how quickly the window closes:
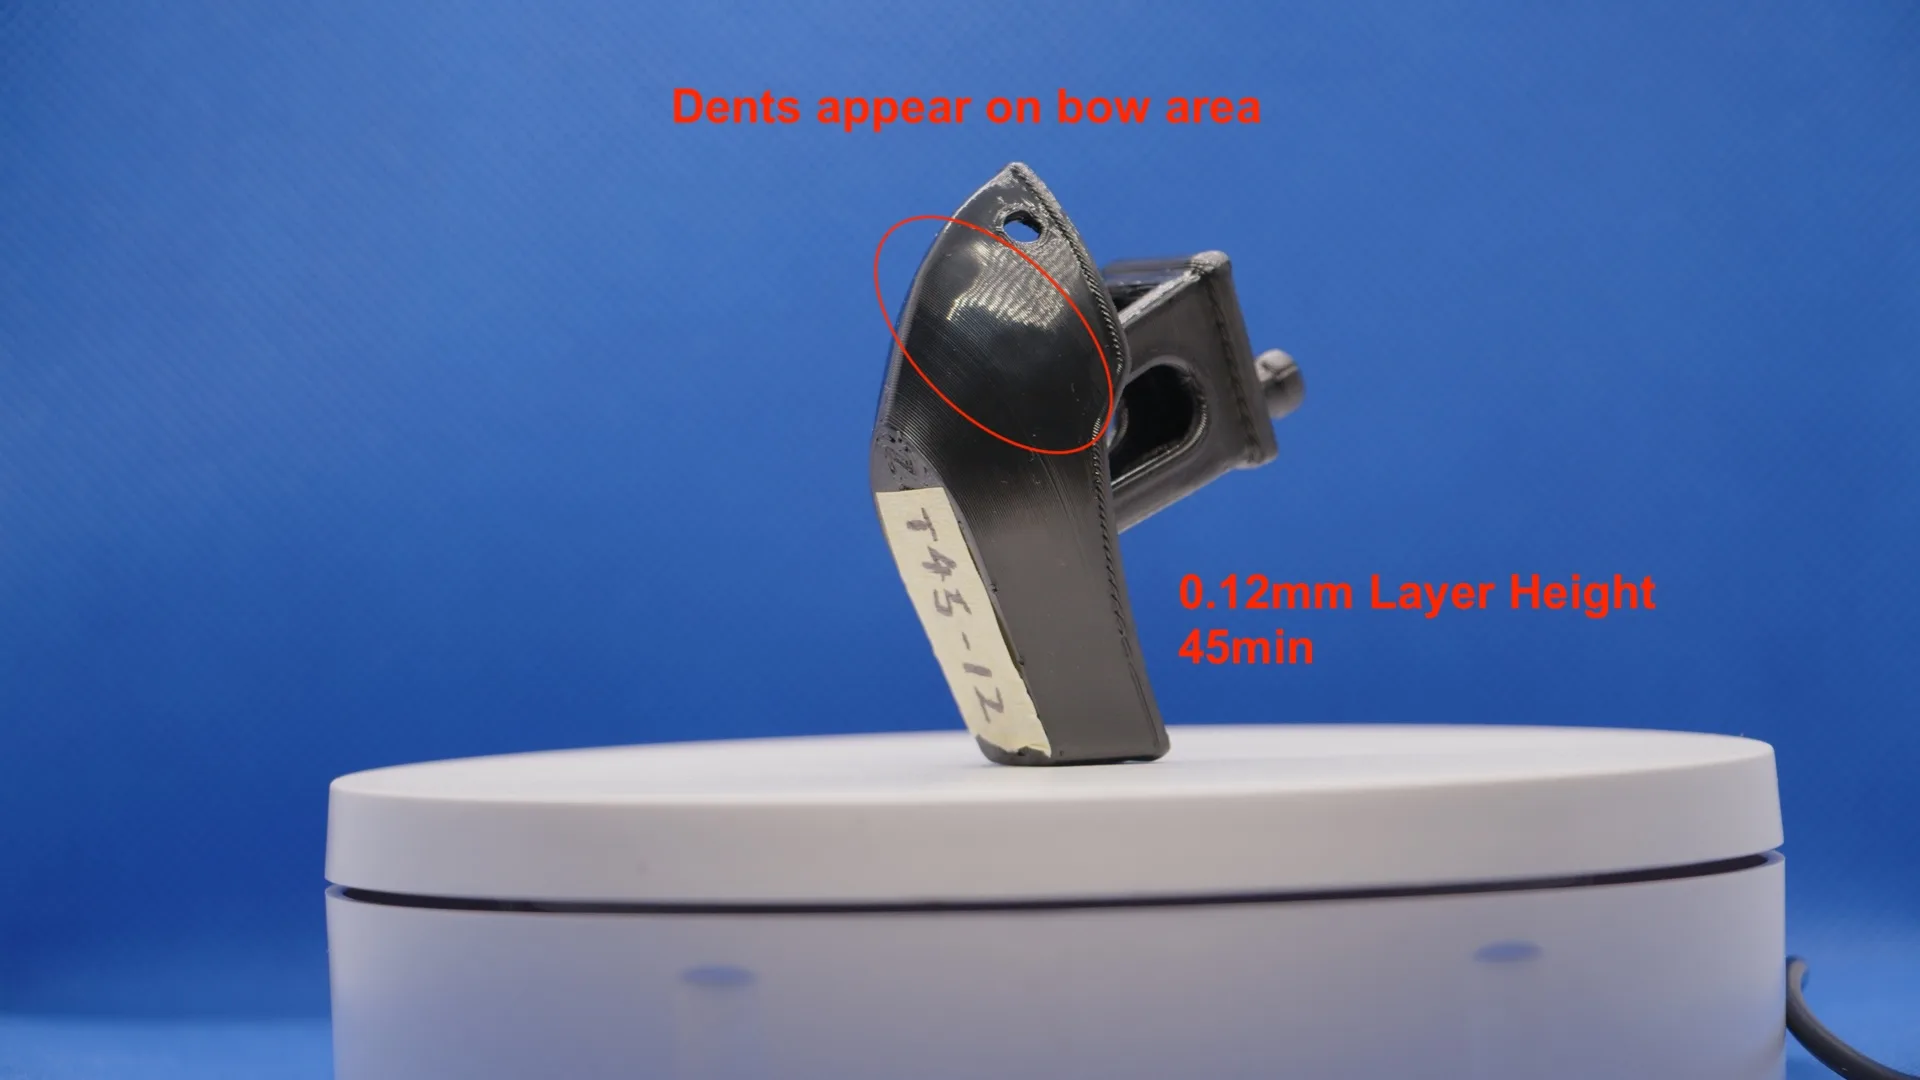
T45-12 — 0.12 mm, 45 min. Subtle but present: the first sign of surface collapse on the bow curve.
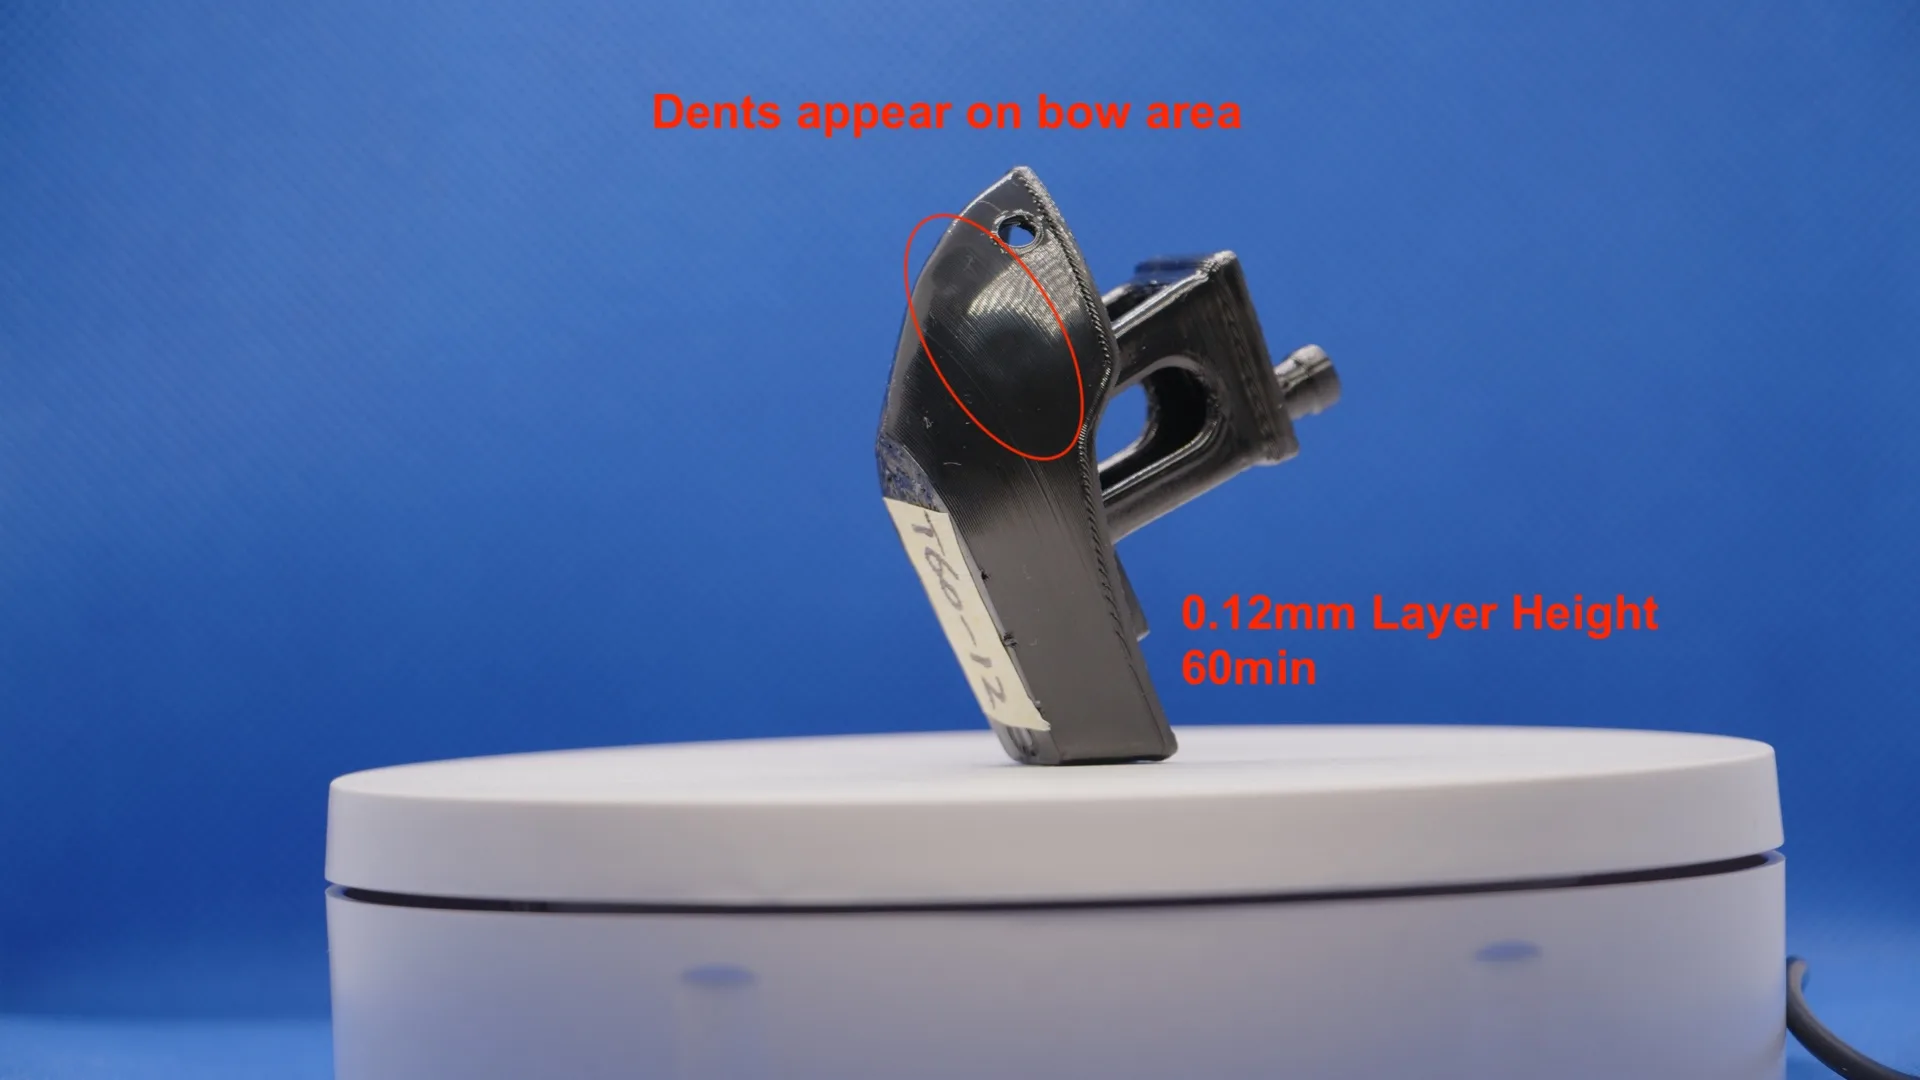
T60-12 — 0.12 mm, 60 min. Clearly visible dent on the bow hull. Point of no return.
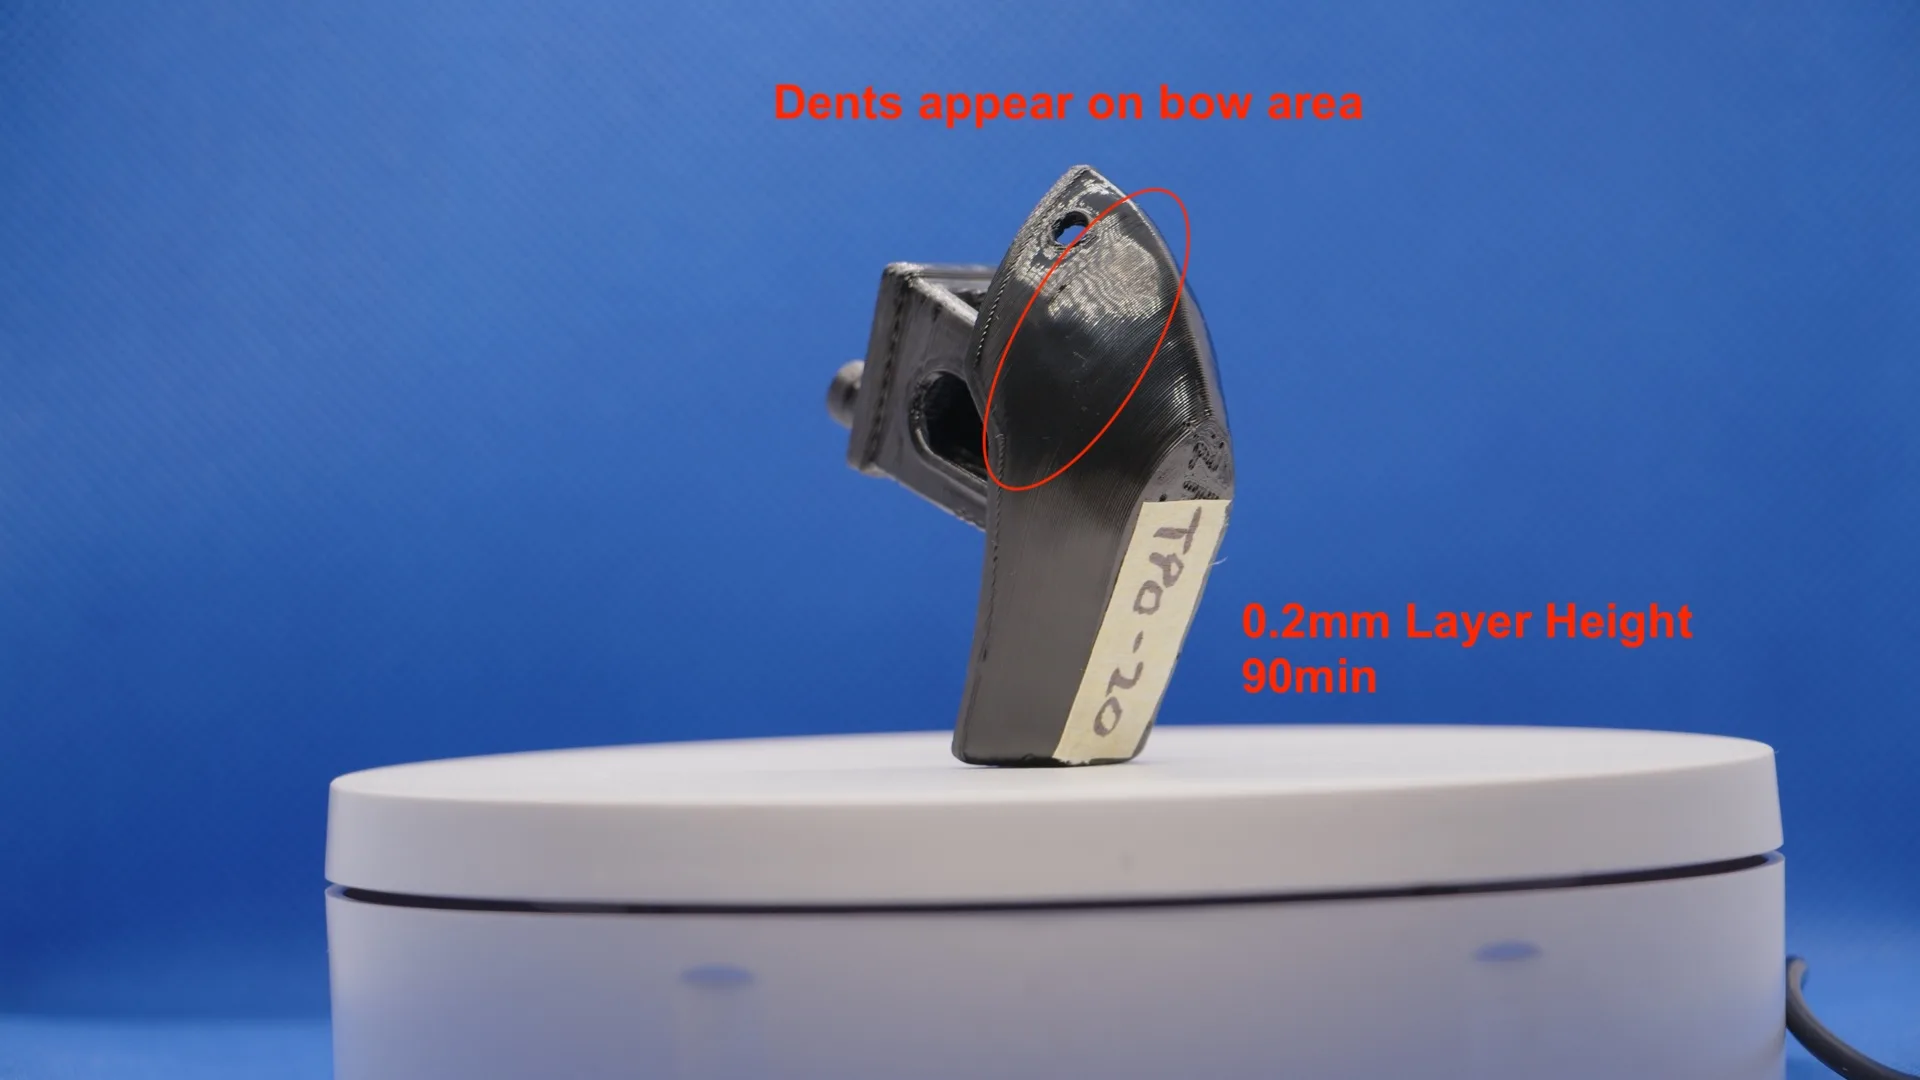
T90-20 — 0.20 mm, 90 min. Even the thicker-layer print develops fairly visible bow denting at extended exposure.
Why the bow specifically? The slicer cross-section tells the story:
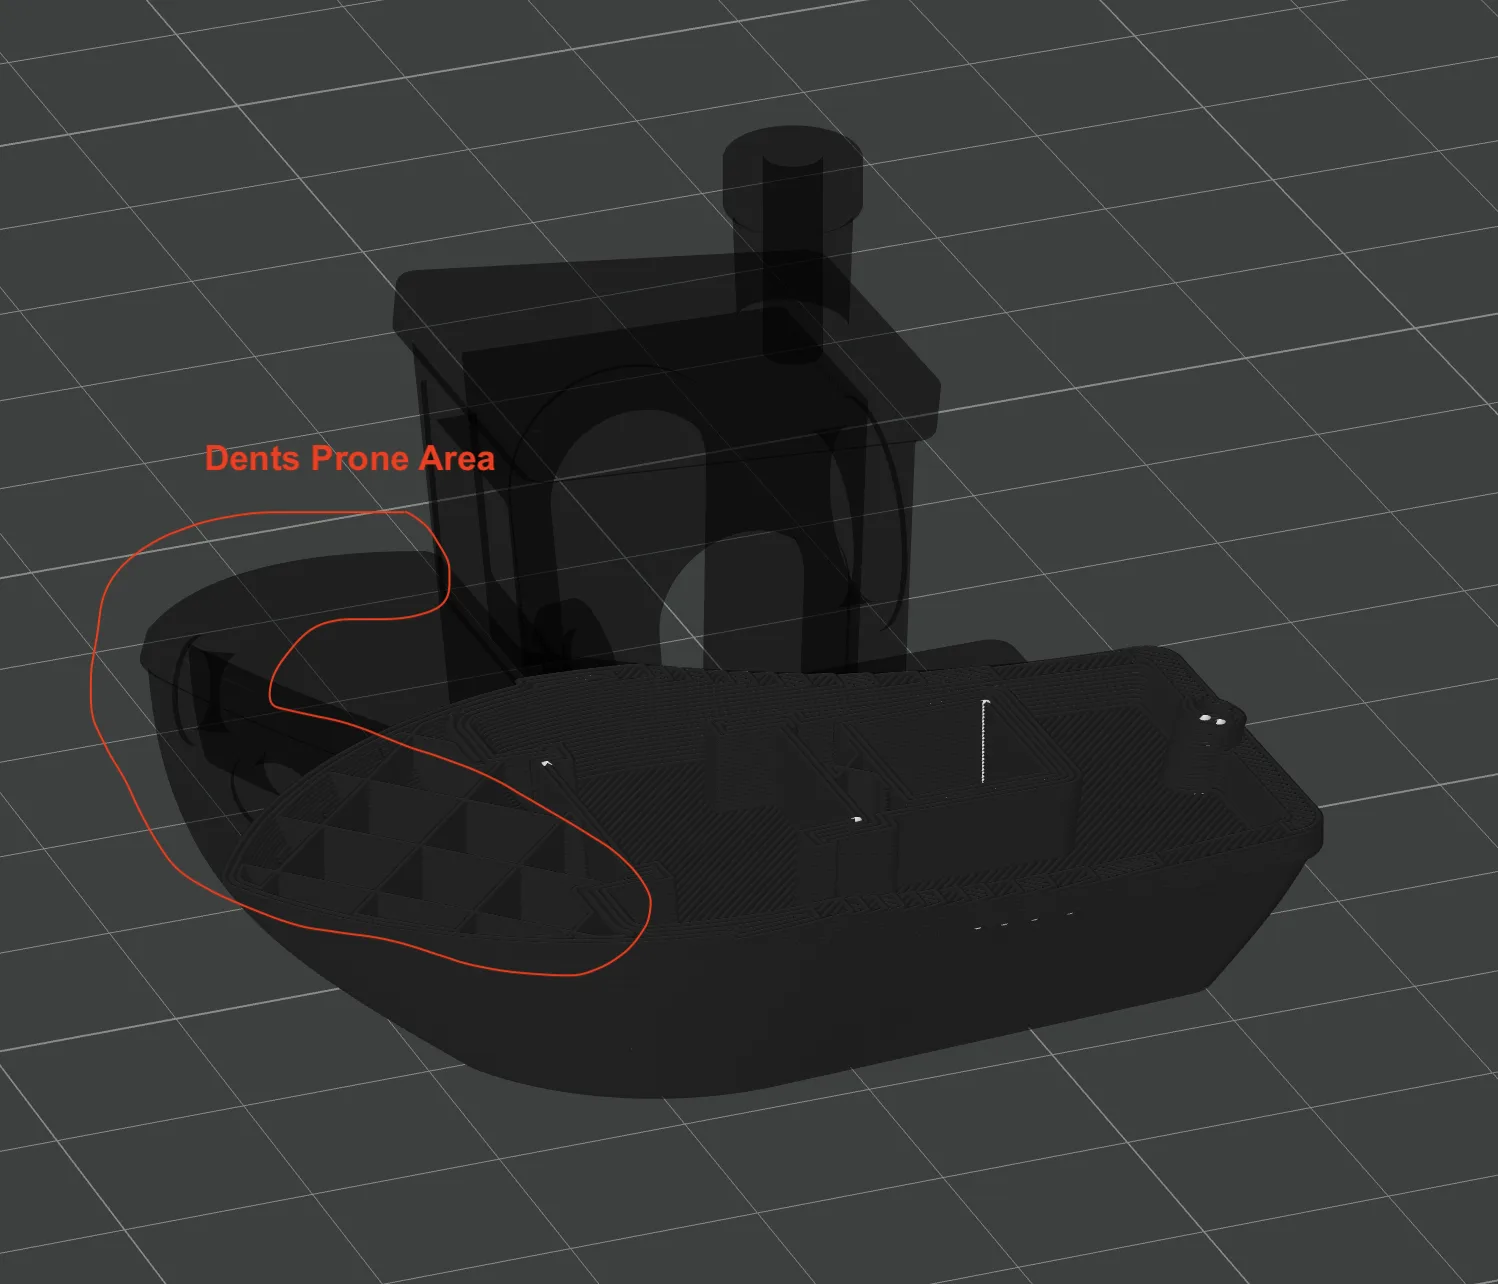
Benchy bow internal geometry — long curved perimeter lines, large hollow void, minimal infill bridging the inner hull. Structurally the weakest area on the model.
The bow is a large curved shell over a hollow void, with long perimeter lines and very little infill structure underneath to resist inward pressure. When acetone softens the outer surface enough, that unsupported shell has nothing holding it out — it dimples inward. This doesn't mean every model you smooth will dent at longer durations. It depends entirely on what's underneath: a model with solid infill or ribs behind its surface will hold. Check your slicer preview before smoothing anything with large hollow areas or thin shells over voids — those are the areas most at risk.
9. Extra Findings
A few things that came out of the test runs but didn't fit neatly into the structured results.
Weight barely changes. Before and after weighing across almost all Benchies showed the same result: ~9g, essentially unchanged. The acetone reaction dissolves and re-flows the surface rather than removing material. For ABS smoothing, this means you're managing vapour quality and distribution — not the amount of acetone the print absorbs.
Acetone consumption is surprisingly low. After each session there was still a noticeable amount of acetone left — even after accounting for what sticks to the container walls and soaks into the towels. The smoothing process itself doesn't consume much at all. 30 mL per session was more than sufficient for a Benchy-sized print. For your own model, the real measure isn't a specific volume — it's whether you can saturate the air inside your chamber. Once the vapour concentration is high enough, adding more acetone doesn't help.
Wick-only timing. Consistent with the above — if you're running without a fan, a +15 minute increase over the fan-assisted recommendation is a reasonable starting point. The underlying chemistry is the same; you're just working with less-even vapour distribution, so give it a bit longer to reach all surfaces. Combine with a smaller container and the gap narrows further.
Don't trust what you see inside the chamber. This one is easy to get wrong. What looks like a full gloss finish through the lid may end up over-smoothed by the time it cures — because acetone gets trapped inside the ABS and keeps working after you remove the part. The surface continues softening for several hours as the residual acetone slowly off-gasses. The fix: aim to pull the print out slightly before it looks done. If you're targeting Grade 4, pull it at Grade 3. It will keep settling on its own and land where you actually want it. This is also why 24-hour assessment matters — scores taken immediately after removal read falsely high.
What does 24 hours look like? At some point I got curious — what happens if you just leave it running way past the point of no return? Like, properly irresponsible amounts of time. So I put a Benchy in and left it for a full 24 hours. When I opened the lid: the model had essentially melted into itself. The hull had collapsed, the detail was gone, and the whole thing felt like warm putty — slightly tacky, soft all the way through, peeling away from the pin supports in slow motion. It didn't break, it just... sagged. A reminder that ABS has a very real softening point, and acetone is just a slow path to the same destination.
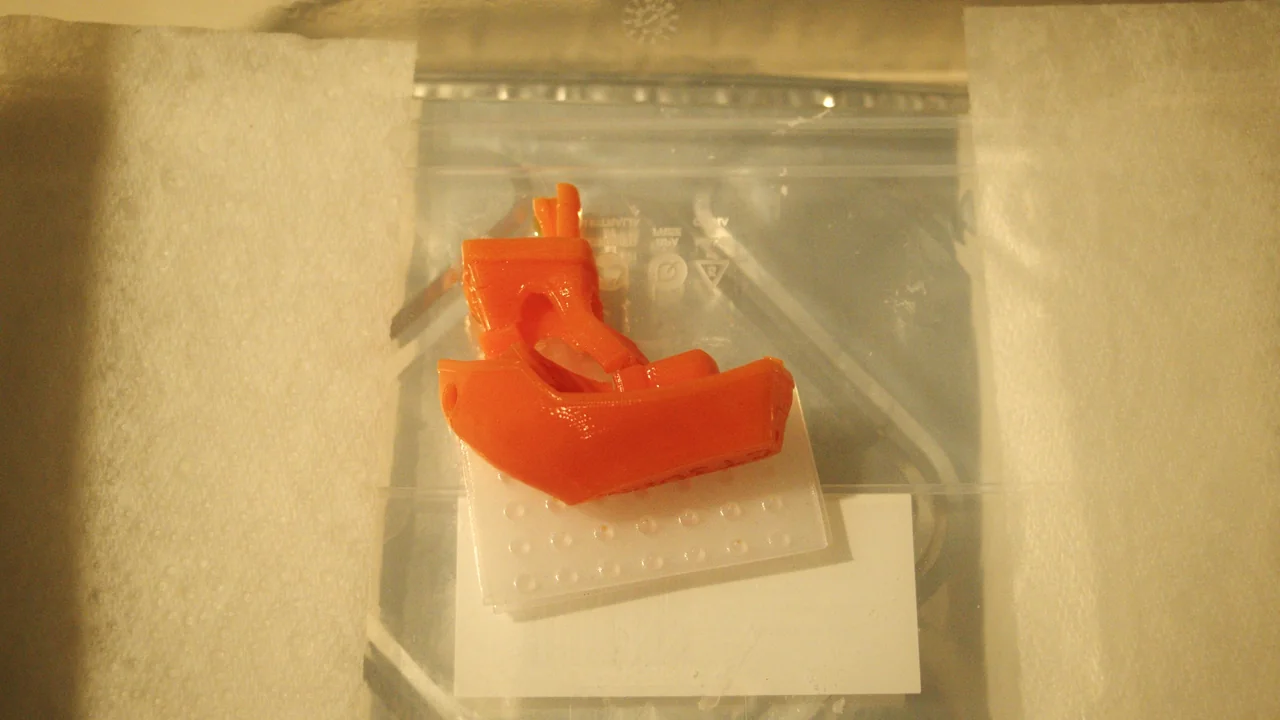
24 hours in. The structure held its rough shape, but the surface had turned to warm putty — tacky, sagging, peeling off the pin supports as one soft blob. Zero recoverable detail.
10. What's Next
There's something else about ABS vapor smoothing that almost nobody talks about — not because it's rare, but because it only shows up long after you've put the print on a shelf and moved on. Weeks. Sometimes months. It's a flaw that makes you question whether the finish was worth it at all.
And the frustrating part: you can't see it coming. The print looks perfect when you take it out. Still looks perfect a week later. Then one day it doesn't.
The next experiment covers exactly that — what the factor is, how to test for it, and whether there's a reliable way to prevent it.
Stay tuned.