The Calibration I Trusted Was the Problem: An H2C First Layer Investigation
Six weeks, around 50 first layer test sheets and two hardware replacements chasing a bad ABS first layer on the Bambu H2C, and the fix turned out to be a slicer checkbox I had deliberately turned off, for what felt like a very good reason.
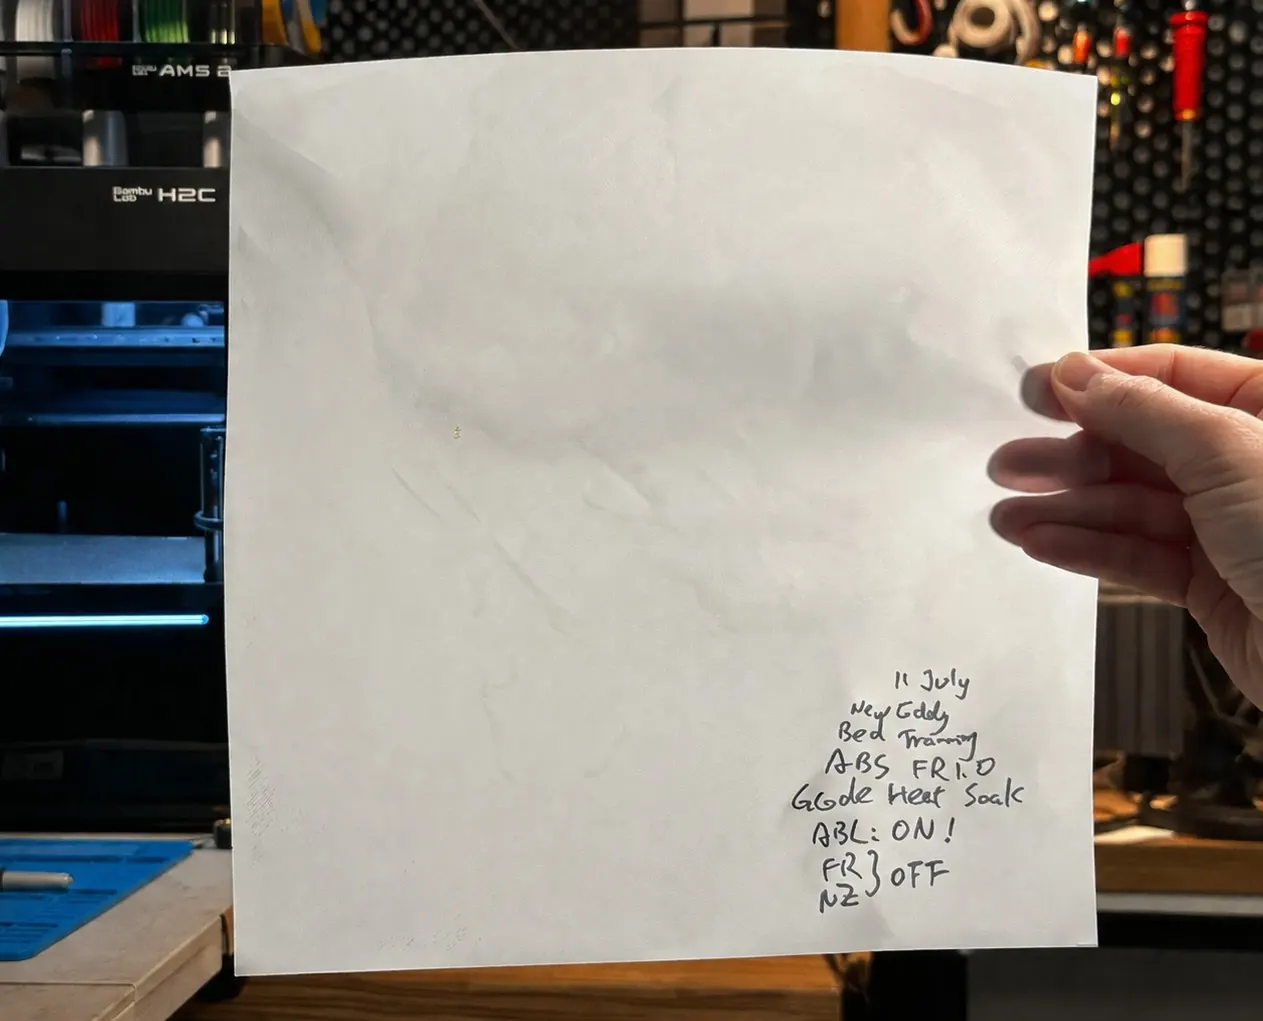
My H2C printed a bad first layer from the day it arrived. Not just ABS. PLA was under-extruded too, it just wasn't obvious until I looked at the bottom of a part properly.
The PLA problem I fixed early, by working through Bambu's H2C first layer optimisation guide step by step. ABS didn't budge. It came out sparse across a third of the plate, and prints peeled off the bed like spaghetti. Six weeks later, after 48 surviving test sheets (closer to 50 counting the ones I tossed along the way) and two hardware replacements, the answer turned out to be a single checkbox in the slicer that I had deliberately turned off, because I thought I understood what it did.
I was wrong in a way that took a very long time to see. This is the whole journey, including the two hypotheses I was confident about and got wrong.
1. The Symptom
Upgraded from a P1S to an H2C about two months in. I have around 2.5 years of printing behind me and work as an engineer dealing with electronics and software daily, so my instinct was to be methodical rather than randomly changing settings. Which, as you'll see, is not the same thing as being right.
Methodical meant a lot of test prints, starting almost immediately:
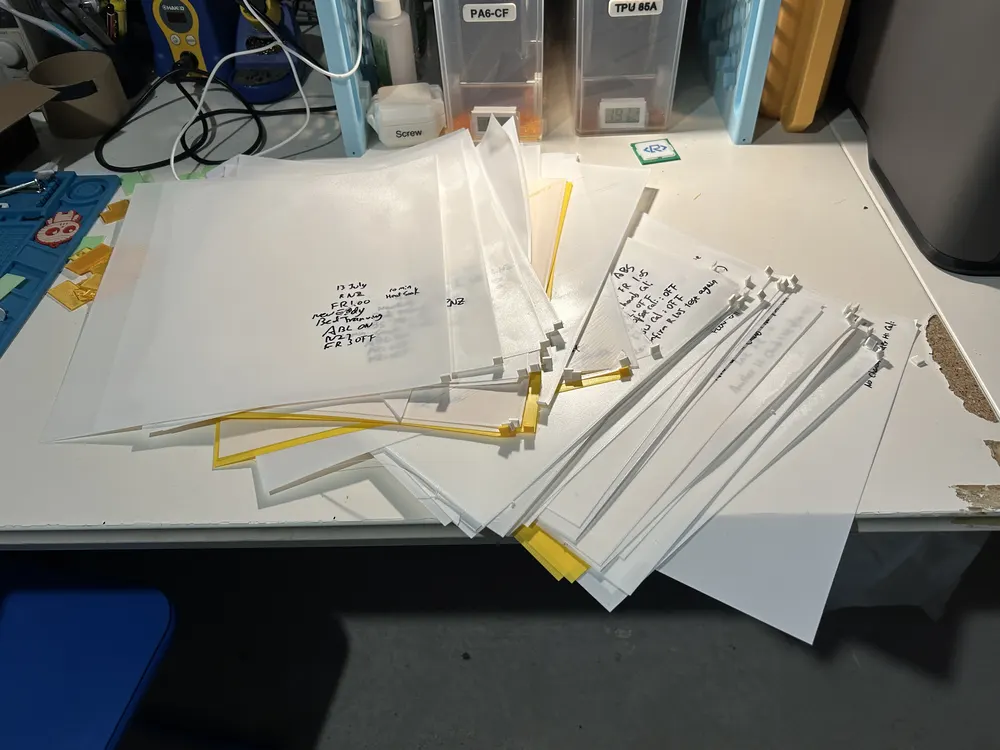
Some of the 48 surviving sheets, closer to 50 counting the ones I tossed along the way. Every one has the date, nozzle and settings written on it in marker, which is the only reason any of the patterns in this article were findable at all.
The very first models I printed on the machine already showed it. Here is the second or third print off the new H2C, a plain PLA Benchy, and a small ABS storage box run with completely default Bambu Studio settings on the textured PEI plate:
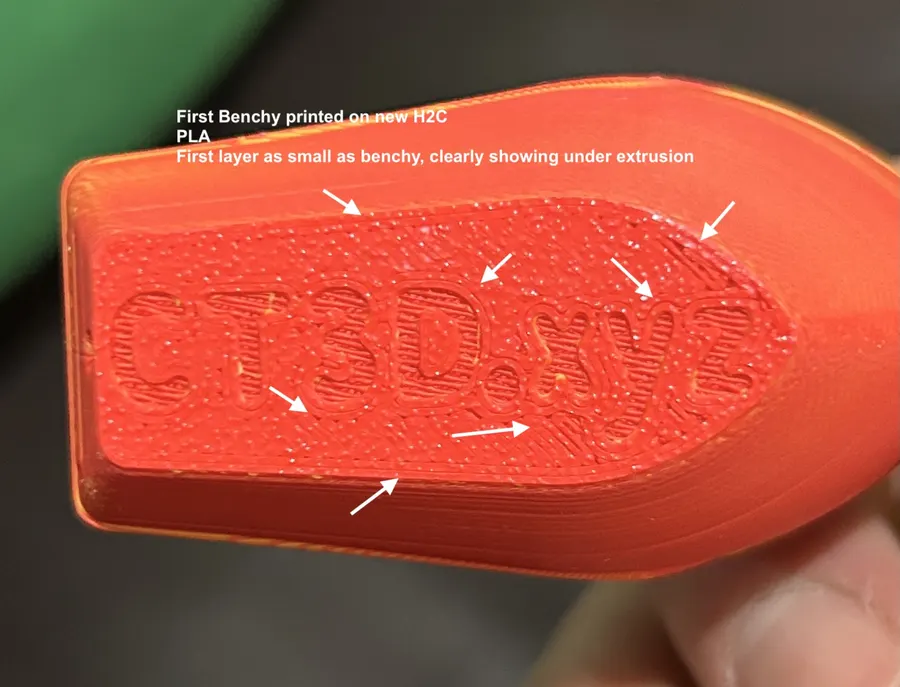
First Benchy off the new machine, PLA. On a footprint this small the first layer should be flawless. Instead the lines are visible, the surface is pitted, and there are pinholes right through it.
That image is worth dwelling on, because it's why I noticed anything at all. A few years back when I got my P1S, a Benchy on a textured PEI sheet came out flawless on the first try, and it stayed that way. So I built up an impression that a first layer on textured PEI is simply fused: a single continuous surface where you cannot pick out individual extrusion lines, just the plate texture. That's the standard I was unconsciously holding the H2C to. Handed that Benchy above, plenty of people would call it fine. To me it was immediately, obviously wrong.
The ABS was not a subtle call by anyone's standard:
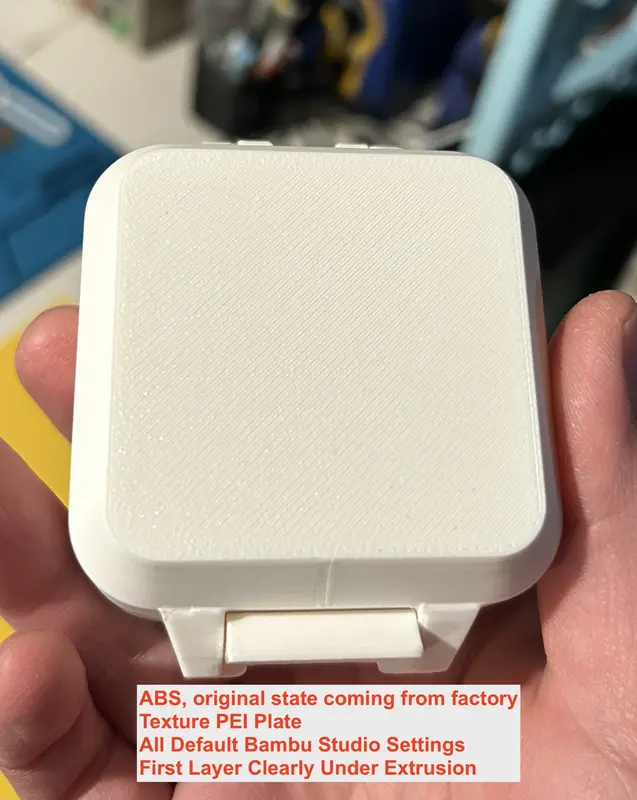
ABS box, factory state, default slicer profile, textured PEI. The bottom surface is sparse enough to see light through the lines.
So the honest starting point is: both materials were under-extruding on layer one. What separated them was how they responded to the fixes in Bambu's guide.
- PLA: went from starved to near-perfect after the mechanical work, both nozzles.
- ABS: under-extrusion across 25 to 50% of the plate, worst at the rear. Adhesion so poor the part would let go mid-print. Unchanged by any of it.
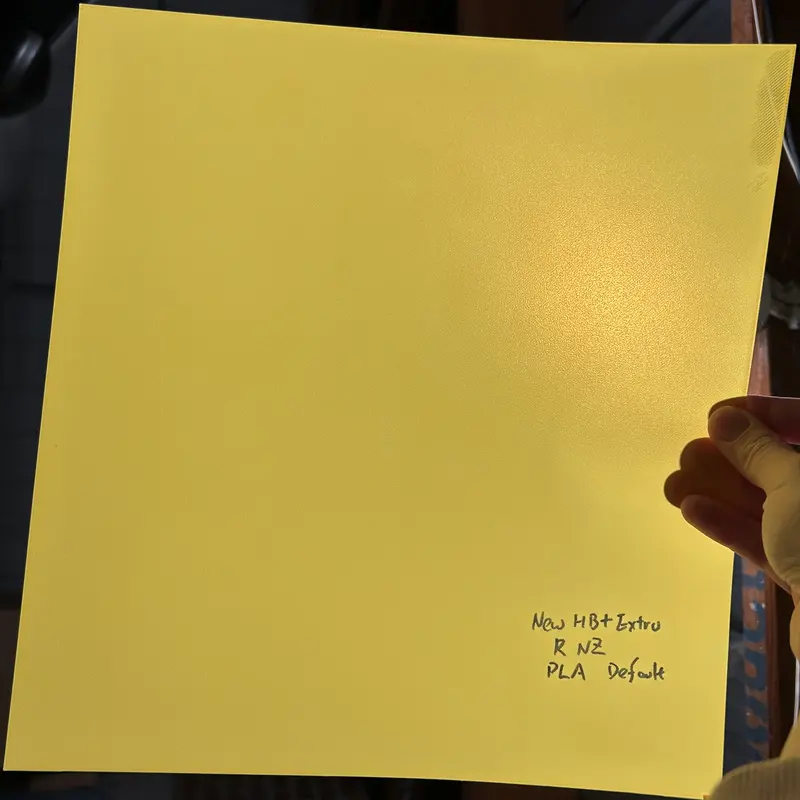
PLA after the round 0 mechanical fixes, >95% good. The clue I kept coming back to.
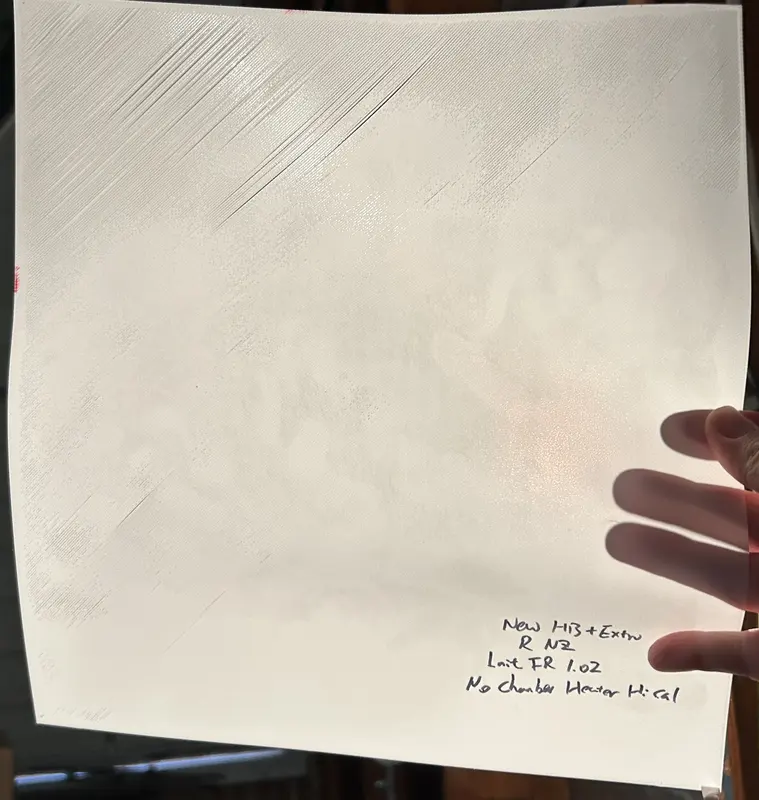
ABS, same machine, same day, after the same fixes. Still ~30% under-extruded across the rear.
It would be easy to call this cosmetic and move on. I didn't, for one specific reason: I print functional parts. One of them developed a crack that originated at a poorly-bonded first layer and propagated under load. On a decorative PLA print, a patchy first layer is an annoyance. On an engineering part carrying thermal and mechanical load, it's a defect that starts at layer one and gets worse.
2. The Answer, Up Front
I'll do what I did in my ABS vapour smoothing post and put the conclusion first. There are two of them, because there were really two problems.
TLDR (PLA, and the machine's baseline): the out-of-the-box mechanical state was not good enough. Shipping hardware still fitted, loose heater screws, and a bed whose four corners sat at noticeably different heights. Working through Bambu's first layer guide, especially removing the transport bracket and properly tramming the bed, took PLA from starved to excellent.
TLDR (ABS, the six week one): turn Auto Bed Levelling ON in the slicer for ABS, even though you have already run High Temperature Bed Levelling. Add a chamber heat soak before the print starts. Do not assume the dedicated high-temp calibration replaces the live one.
The mental model I had backwards
I believed "High Temperature Bed Levelling" (HTBL) was the proper, accurate calibration path for engineering materials, and that leaving slicer Auto Bed Levelling (ABL) on would override it with something cruder. So I turned ABL off. For six weeks. In almost every test, the PLA sheets being the one exception, which is part of why the PLA result kept looking deceptively clean.
Here is what is actually happening, confirmed later by Bambu's engineering response:
HTBL is not a replacement for ABL. It is a thermal-deformation correction layer applied on top of the live ABL mesh.
Turning ABL off didn't select the better mesh. It deleted the foundation that the correction was supposed to sit on.
The working recipe
| Step | Setting |
|---|---|
| Chamber | Preheat and soak at 65 °C for ~20 min before the print starts |
| Slicer, Auto Bed Levelling | ON, this is the controlling variable |
| Slicer, Flow Dynamics Calibration | Should not matter, unless you have a custom first layer flow ratio, in which case turn it off |
| Slicer, Nozzle Offset Calibration | Should not matter |
| Initial layer flow ratio | 1.0 works; 1.02 gets it PLA-like |
With this, my right nozzle reaches ~95% good on ABS. The left nozzle is acceptable, no more large sparse regions, but still trails the right. More on that in section 9.
If that's all you came for, you're done. The rest is how I got there, and why it took so long.
3. Round 0: Everything the Wiki Says
Before raising a ticket, I worked through Bambu's first layer optimisation guide properly. I did essentially every step in it except the start G-code change, since my target was ABS and I wanted to keep the print start clean for now:
- Removed the shipping bracket screws and the black transport plate under the front of the heated bed.
- Tightened the front and rear screws on the left ceramic heater base, and the four screws behind the heating element.
- Loosened and re-tightened the four bottom screws on the right induction nozzle.
- Manual bed tramming with the printed gauge block, more than ten times.
- Cleaned the nozzle wiper, silicone brush and nozzle tip before every single test print.
- Re-ran auto bed levelling, high temperature bed levelling and nozzle offset calibration after every hardware change.
- Raised the initial layer flow ratio to 1.02, with flow dynamics calibration off so the value actually took effect.
Result: PLA went from starved to excellent on both nozzles. ABS did not move at all.
I wasn't re-testing PLA at every individual step, because ABS was what I was chasing, so I can't point at the one change that fixed it. But by the end of round 0, and before a single part had been replaced, PLA was clean.
That split is the first real piece of evidence, and I under-weighted it at the time. Mechanical fixes helped the low-temperature case and did nothing for the high-temperature case. The ABS problem was never purely mechanical.
3.1 What I think was actually wrong with PLA
This part is my own reasoning rather than anything Bambu confirmed, so take it as a hypothesis. But by the end of the investigation I had handled the bed enough times to be fairly confident about it.
I don't think the H2C's heatbed leaves the factory flat enough. ABL can compensate for a certain amount of that, but only where the deviation is gentle. Where the transition between high and low regions is steep, the mesh can't follow it, and you get exactly the kind of localised starved patch I was seeing. Three things pushed me to that conclusion:
The replacement bed had the same problem. When Bambu sent a new heatbed, I fitted it and assumed it was fine by definition, then spent weeks testing ABS on it. It was only late in the investigation that I did a careful manual tramming pass and found the four corners sitting at noticeably different heights straight out of the box. On some corners the tramming gauge block slid in with an obvious gap; on others it was too tight to get in at all.
The corner screws are not linearly behaved. I had assumed each corner screw would give roughly the same height change per turn. It doesn't work out that way. The two rear screws, particularly the rear right one closest to the nozzle, are dramatically more sensitive: an eighth of a turn is enough to go from loose to too squishy. The two front screws are the opposite, where a quarter turn barely changes anything you can feel. If it is that awkward to control by hand, I doubt it's easy to control on an assembly line either. And a bed that starts with built-in distortion will only distort further once it's hot, which is where ABS lives.
Following the tramming spec can leave the bed sitting low. Using Bambu's official gauge block, I ended up with the bed low enough that the front of the magnetic plate sat below the plastic frame and the plate guide block. Attaching a build plate on top of that, you can feel it bend: the front edge is pulled down by the bracket while the middle sits higher, so the plate takes on a slight bow front to rear. That's a curve nobody asked for, sitting under every print.
None of this directly explains the ABS failure, which turned out to be a calibration model problem. But it does explain why a brand new machine was starving PLA on a Benchy, and it's worth knowing before you assume your own bed is a flat reference surface.
4. Round 1: New Heatbed, New Extruder, Same Problem
Bambu replaced the heatbed and the dual-extruder assembly. The ABS first layer was unchanged.
At that point I stopped changing settings hopefully and built a proper matrix: 23 controlled first-layer tests, varying nozzle (left/right), material (PLA/ABS), initial flow ratio, which calibrations had been run and how recently, and which slicer calibrations were enabled. Every result scored by percentage and location of the defect.
Four patterns came out of it.
4.1 PLA is good on both nozzles
Tests 3 and 4: >95% good, left and right, at default flow. Whatever is still wrong is not bed flatness, not tramming, not gantry geometry. Those were the round 0 problems, and they'd been dealt with. A remaining mechanical fault of that kind would break PLA too, and PLA was now clean.
4.2 Good ABS results only happen right after a fresh, hot calibration
The handful of >95% ABS results clustered within hours of a fresh HTBL run. The catastrophic ones were stale-calibration or overnight cold-start prints.
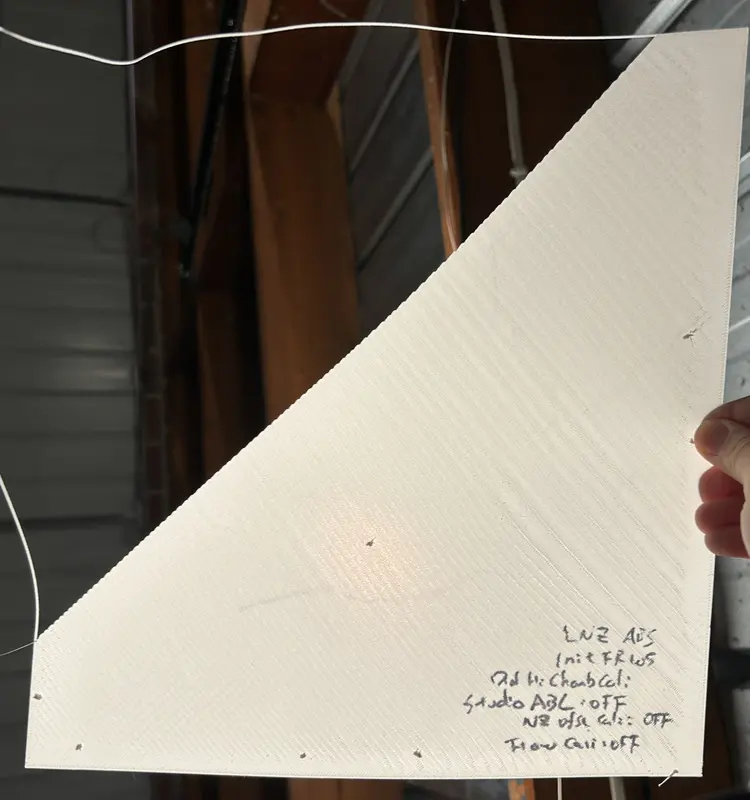
Overnight cold start on a stale calibration, massive over-extrusion. And yes, it's only half a sheet: I could already see where it was going, so I stopped it rather than waste the rest of the filament and the plate time.
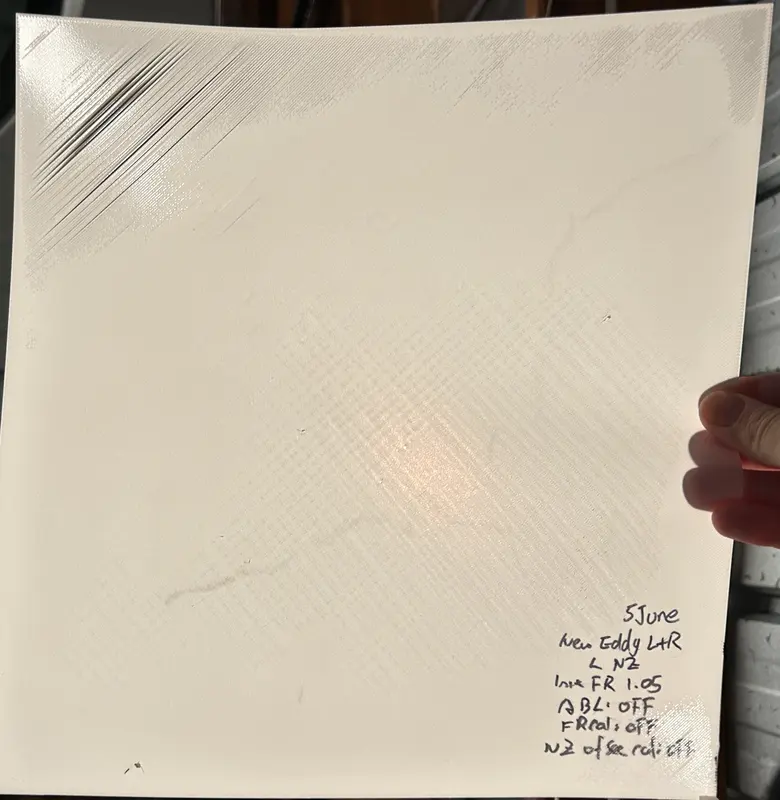
Left nozzle: under-extruded at the rear, over-extruded at the front. The sensed mesh is warped, not just offset.
4.3 The two nozzles fail in opposite directions
This is the finding I built everything else on. Same evening, same inherited levelling, same flow ratio of 1.0:
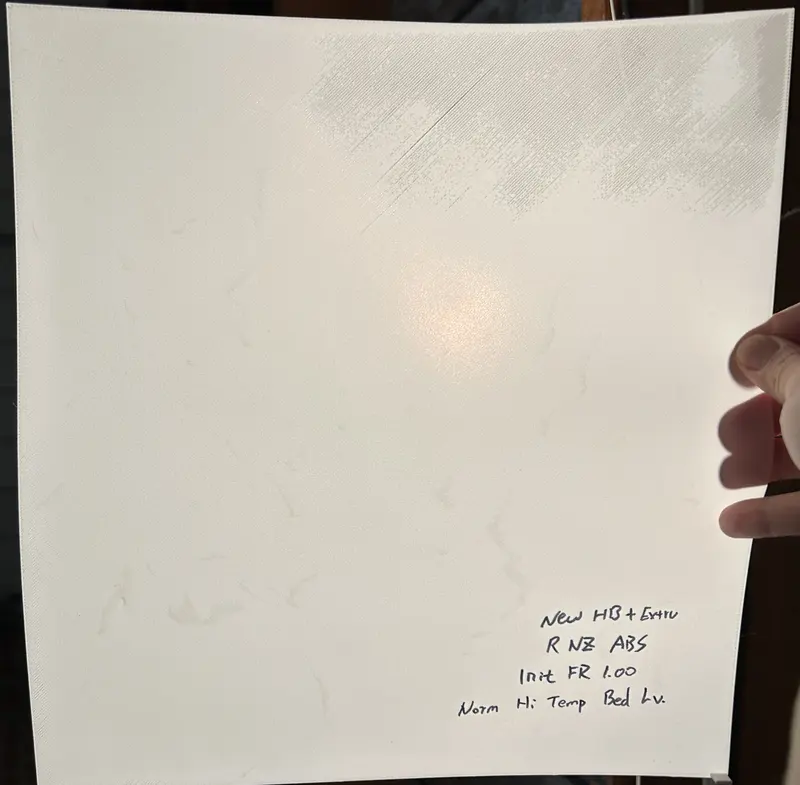
Right nozzle, 20% under-extruded. Nozzle sits too high.
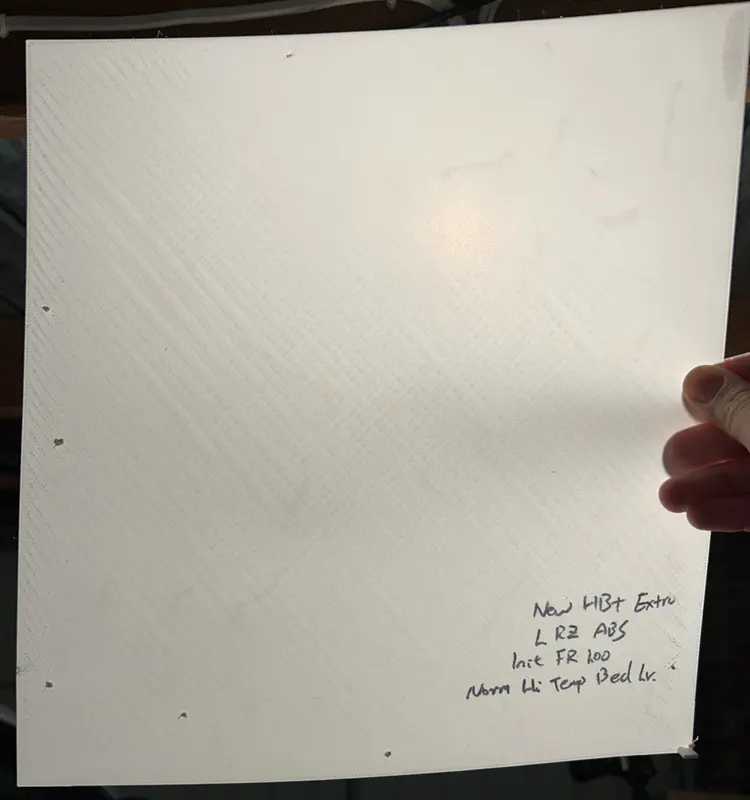
Left nozzle, hours later, 75% over-extruded. Nozzle sits too low.
Any shared cause, such as bed flatness, frame thermal expansion, chamber temperature or the heatbed itself, would push both nozzles the same way. Opposite-sign Z errors at the same moment can only come from something measured per nozzle.
4.4 Left is consistently worse, in a repeatable shape
With slicer ABL on, the left nozzle produced the same rear-left diagonal under-extrusion every time, across different flow ratios and different calibrations. That reproducibility mattered: a geometrically consistent error is a fingerprint, not noise.
The hypothesis
The H2 series probes Z per-nozzle using eddy current sensing, and eddy sensors are inherently temperature-sensitive. One drifting sensor per hotend, left worse than right, explained every observation at once: PLA good and ABS bad, opposite-direction left/right errors, the fresh-versus-stale calibration dependence, and the reproducible left-nozzle diagonal.
I was confident. Bambu support agreed it was plausible. It was also wrong.
5. Round 2: Both Sensors Replaced, and the Hypothesis Dies
Bambu shipped replacement eddy current coils for both nozzles. I fitted them carefully: correct gap spec on each side (folded A4 paper thickness on the left, single sheet on the right), cleaned off the green thread-locking residue on the old left mount, all cables carefully reseated, then re-ran every calibration.
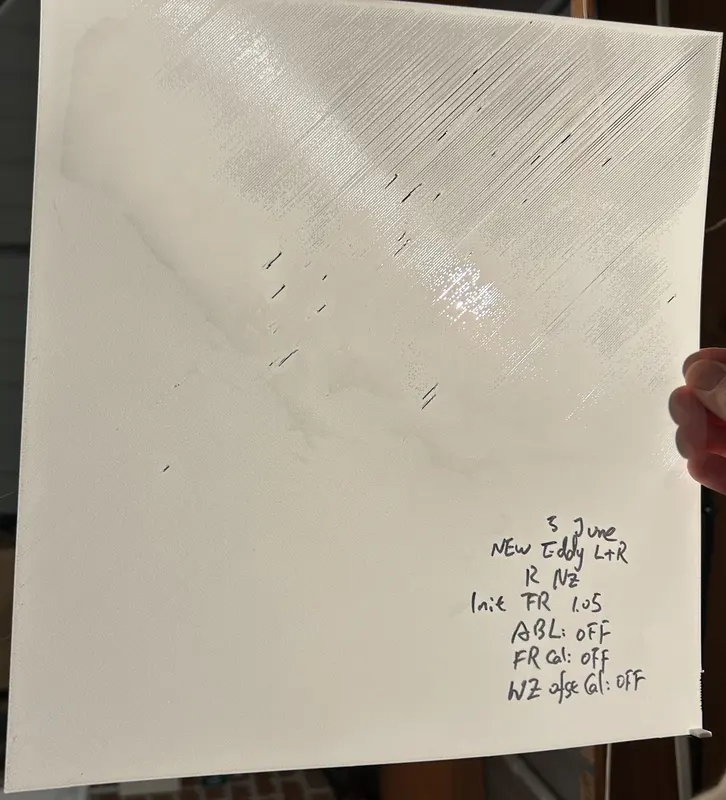
ABS after both the heatbed/extruder swap and the eddy sensor swap. Still ~40% under-extruded. Two hardware replacements, no change.
No meaningful change. Left still over-extruded, right still under-extruded, meshes still mismatched. Right was arguably slightly worse than before.
That was the low point. Two hardware replacements, six weeks, a matrix of 30-odd tests, and a hypothesis that fit all the evidence had just been falsified.
This is the useful part
Killing that hypothesis is what eventually solved it. As long as I believed the sensors were faulty, every result was "more evidence of drift" and I had no reason to question my own process. Once hardware was definitively ruled out, the only remaining suspect was something I was doing, and the first thing I had to re-examine was the assumption I'd been treating as settled since day one.
6. The Accidental Clue
The break came from a mistake.
I ran a heat soak, waited for the chamber to hit 65 °C, ran High Temperature Bed Levelling, and then forgot to turn the chamber heater off. I went for lunch. Came back around 1 PM, chamber still sitting at 65 °C, and started an ABS first layer test on a whim.
>95% good.
That single result didn't fit the sensor story at all. Nothing had been recalibrated, no hardware had changed. The only difference was that the machine had been sitting hot and stable for a long time before printing.
So Bambu's earlier suggestion, a start G-code snippet that holds the chamber at 65 °C for 20 minutes before printing, went from "generic advice I'd half-dismissed" to something worth testing properly. And once I was testing the thermal variable properly, I finally also tested the one setting I had never varied.
7. Round 3: The Variable I Never Tested
I had turned slicer Auto Bed Levelling off in nearly every test in this entire investigation, on purpose, because I believed HTBL was the more accurate mesh and I didn't want a cruder live probe overriding it.
So I ran the 2×2 I should have run in week one. Right nozzle, ABS, flow ratio 1.0, everything else identical:
| Test | Slicer ABL | 20 min heat soak | Result |
|---|---|---|---|
| 5 | OFF | No | >40% under-extrusion, rear, right, front-left |
| 6 | OFF | Yes | >45% under-extrusion, rear, right, front strip |
| 7 | ON | No | >15% under-extrusion, rear-left, front-left |
| 8 | ON | Yes | >5% under-extrusion, small rear-right and front-left only |
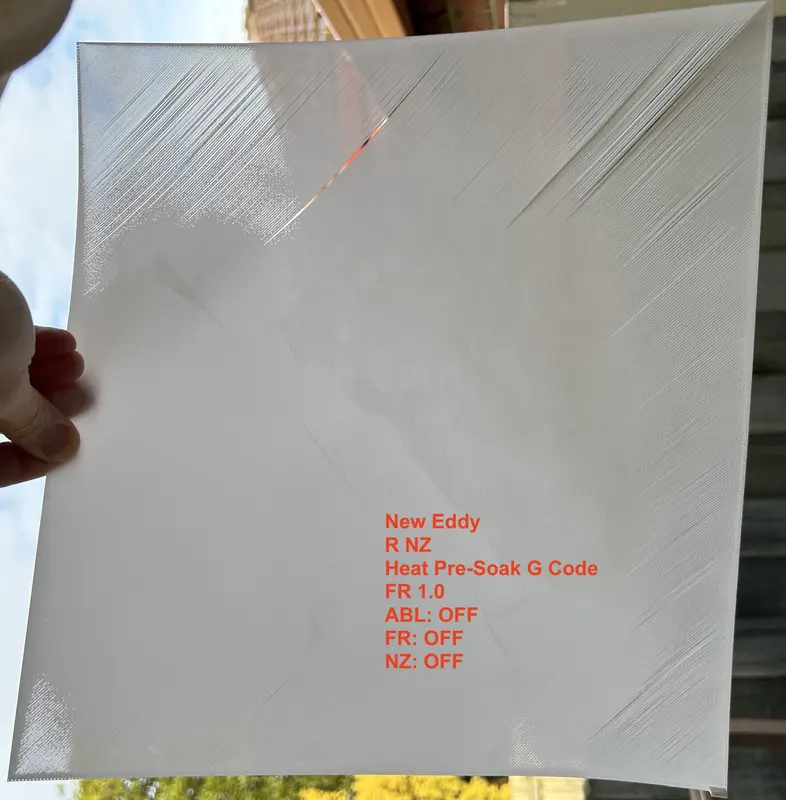
ABL off, no soak
>40% under
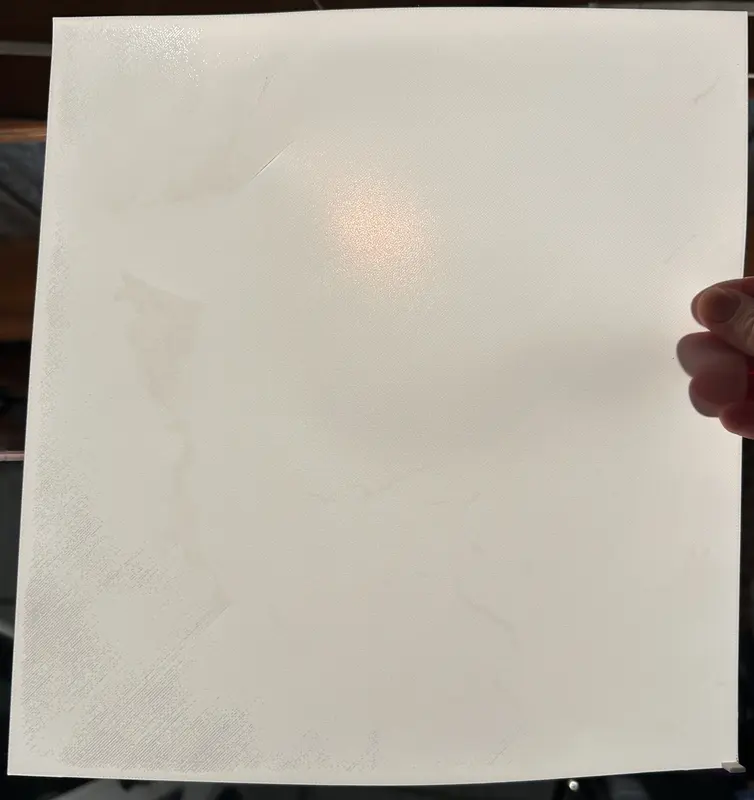
ABL on, no soak
>15% under
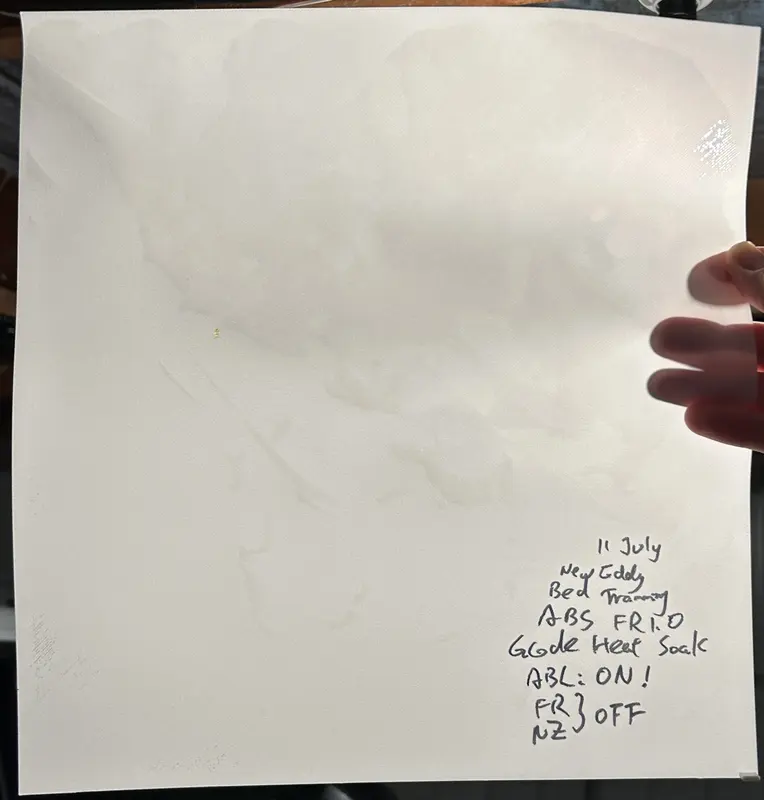
ABL on + 20 min soak
>5% under
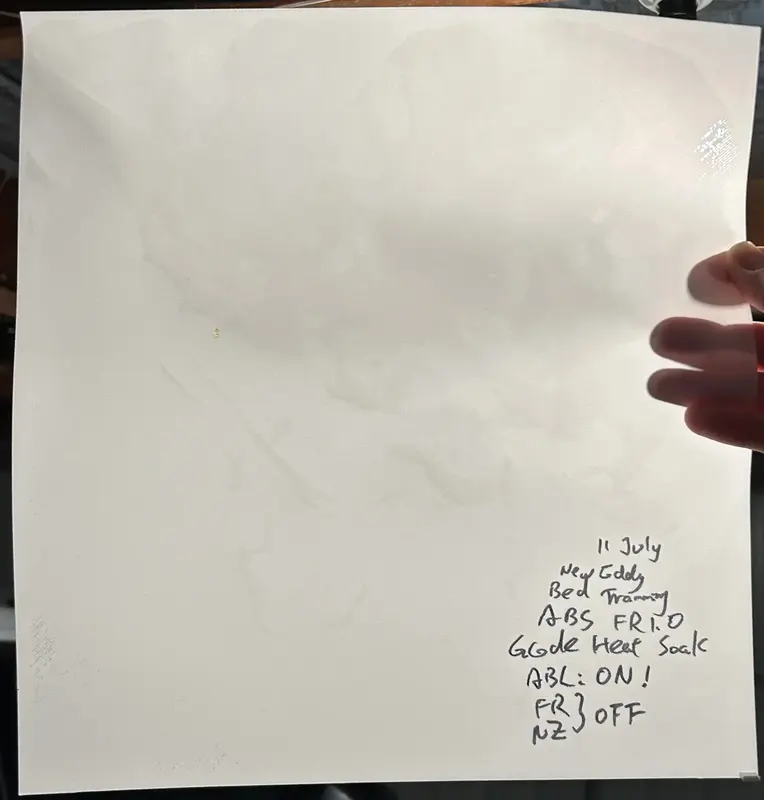
The sheet that ended it. 11 July, ABS at flow ratio 1.0, G-code heat soak, flow dynamics and nozzle offset off, and the one thing I'd never tried: ABL: ON. I wrote it on the sheet with an exclamation mark because I already knew what it meant.
Read the first two rows together: with ABL off, the heat soak achieved nothing. 40% versus 45% is noise. That's why Bambu's soak suggestion looked like a dead end when I first tried it. I was soaking the chamber and then throwing away the measurement that would have benefited from it.
Turn ABL on and the same soak takes you from 15% to 5%. The soak is real, but it is a multiplier on live probing, not a substitute for it. ABL is the controlling variable.
The left nozzle followed the same pattern, 40% under with no heat soak and 15% under with 20 minutes, just from a worse baseline.
8. Why: Bambu's Own Engineering Answer
I wrote all this up and pushed for a technical explanation rather than reassurance. To their credit, the reply I got back was genuinely good, and it's the piece that makes six weeks of results make sense at once:
The standard ABL and the High-Temperature Bed Levelling are not mutually exclusive or overriding — rather, they work together in a complementary, layered relationship.
Standard ABL (real-time probing): performed during print preparation, primarily used to capture the fundamental topology under the current physical state.
High-Temperature Bed Levelling: specifically designed to analyse the thermal deformation differential (Delta Map) after the heatbed expands under high temperatures.
The algorithm does not make an "either/or" choice between the two. Instead, it takes the thermal deformation compensation map measured by HTBL and applies it as a correction layer, overlaid on top of the real-time physical mesh measured by standard ABL.
And on the soak:
The factory-default HTBL process was designed with a trade-off in mind — to avoid subjecting the average user to a tedious wait of several tens of minutes, it only heats the heatbed to a high temperature, without forcibly waiting for the entire chamber to reach thermal equilibrium.
Within a 65 °C chamber environment, the printer's gantry, carbon-fibre rods, Z-axis leadscrews and overall frame will all undergo micron-level thermal expansion and structural drift. If probing begins before the chamber has reached thermal equilibrium, the printer is effectively mapping a mechanism whose dimensions are still dynamically changing.
Everything falls out of those two paragraphs:
| Observation | Explanation |
|---|---|
| PLA fine after round 0, ABS still bad | Low chamber temp means little frame drift, so the missing base mesh barely matters |
| ABS only good right after a fresh hot cal | I was accidentally matching the print's thermal state to the calibration's |
| Overnight cold starts catastrophic | Maximum mismatch between calibration state and print state |
| Heat soak alone did nothing | Soaking helps the probe, and I had disabled the probe |
| Two hardware swaps changed nothing | There was never a hardware fault |
The hardware was fine the whole time, sensors included. The fault was a wrong mental model, reinforced by a UI where the option that sounds like the rigorous engineering-material choice is only ever half the answer.
9. Where It Actually Stands
Right (induction) nozzle: ~95% good on ABS with ABL on and a 20-minute soak. At an initial layer flow ratio of 1.02 it looks essentially like a PLA first layer. Solved, in practice.
Left (conduction) nozzle: clearly improved, the large sparse regions are gone and it's in acceptable territory, but still visibly behind the right. Bambu attributes this to the fundamentally different heating methods (the left is heated by thermal conduction from the hotend assembly, the right by induction) and suggests compensating with a higher nozzle temperature. I haven't run that test yet.
The rear-right sparse spot shows up in every result including the best PLA prints. That's a genuine localised low spot in the bed, cosmetic, a separate problem, parked.
Questions still open
Two things I raised that I'd still like a clearer answer on:
- If live ABL after full thermal soak is more representative, when is HTBL alone ever the right choice? The documentation and the UI both gave me the impression the dedicated high-temperature calibration was the complete, correct path for engineering materials. That impression cost me six weeks. If the intended workflow is "always ABL on, HTBL supplements it," the guidance should say so plainly.
- The left coil gap spec. The wiki specifies folded-A4 thickness on the left versus single-A4 on the right. Bambu confirmed this is intentional and down to the differing nozzle structures. But with the left consistently building a worse mesh, I'd like to know whether the H2C's mesh model is tuned for the H2C specifically, or inherited from the H2D, given the left side's different mechanics and EMI environment.
To be fair to Bambu: once I pushed past the first-line "this is within normal tolerance" replies with actual structured data, I got a real engineering explanation. The friction was that it took two hardware replacements and six weeks to get there, and the explanation, not the hardware, is what fixed it.
10. If You Own an H2C
If your first layer is starved out of the box, or ABS is bad while PLA behaves, or your two nozzles fail in opposite directions, try this before you raise a ticket:
- Do the whole first layer guide first, and don't assume a new machine is set up. Shipping bracket out, heater screws checked, and a real manual tramming pass with the gauge block. This is what fixed PLA for me, and it costs you nothing but an evening.
- Turn slicer Auto Bed Levelling ON for ABS. Even if you've run High Temperature Bed Levelling. Especially if you've run it, because HTBL needs a live mesh underneath it to correct.
- Add a chamber heat soak to your start G-code for engineering materials. Hold 65 °C for ~20 minutes before the print begins, so the frame stops moving before anything gets probed.
- Leave flow dynamics calibration off so your own flow ratio actually applies.
- For ABS, start at initial layer flow ratio 1.0, and go to 1.02 for polish. If you need 1.05+ to get a clean layer, you're compensating for a Z error with flow. That's a crutch, and it'll fail as soon as the thermal state shifts.
- Don't queue ABS onto a cold machine.
11. What I'd Tell Myself Six Weeks Ago
Three things.
Build the matrix earlier. The 23-test matrix is what turned a vague "ABS is bad" into a specific, defensible claim about per-nozzle opposite-direction errors. Randomly nudging flow ratio for two weeks produced nothing. That part of the method was right, and it's the reason Bambu engaged seriously.
A falsified hypothesis is progress, not wasted time. The eddy sensor swap felt like two weeks thrown away. It wasn't. It was the step that eliminated hardware entirely and forced me to look at my own assumptions. If the sensors had never been replaced, I'd still be blaming them.
Audit the variable you never varied. Every experiment I ran had ABL off. It was a constant, so it never appeared in any comparison, so it was invisible. I'd made a decision in week one, filed it under "settled," and then ran forty experiments that could never detect it was wrong.
The most dangerous variable in any investigation isn't the one giving you confusing results. It's the one you were so sure about that you never bothered to test it.